
If you’ve ever tried to wrap your head around OAuth2 workflows, you know the struggle. The terminology sounds like a riddle, and the flow diagrams look like something straight out of a conspiracy theorist’s playbook.
But here’s the thing: once you understand the fundamentals of OAuth2, you’ll have the right tools for securing your next project. This article will simplify OAuth2, demystifying authorization codes, PKCE, and everything in between.
What Is OAuth2, Really?
OAuth2 is a protocol that allows applications to securely obtain limited access to user accounts on an HTTP service, like Google, Facebook, or Github. Think of it as a “digital bouncer” that checks who’s allowed into the club (or app) and what areas they can access. But this bouncer doesn’t care if you’re underage; it cares about whether you have the right permissions.
OAuth2 works in scenarios where an app needs to access data from another service without making users hand over their password. Because let’s be honest: if you’re asking users to drop their Gmail password into your app, you’re asking for trouble (and a big red flag from any security-minded developer).
The Main Players in OAuth2
Before diving into workflows, you need to understand the key actors in this little drama:
- Resource Owner: Typically, the user. The one whose data you want to access.
- Client: The app that wants to access the user’s data. (Yes, that’s your app!)
- Resource Server: The server holding the user’s protected resources. For example, an API that manages user profiles.
- Authorization Server: The server that authenticates the user and issues access tokens. Often, it’s the same as the resource server but with a split personality.
Think of it as a high-stakes heist movie: the Resource Owner is the person with the key to the vault (their data). The Client is the smooth-talking con artist (your app). The Resource Server is the vault, and the Authorization Server is the security system you have to charm your way past. Got it? Good. Let’s plan the heist.
Authorization Code Grant
When it comes to OAuth2, the Authorization Code Grant is like the “gold standard” for secure token exchanges. Why? Because it lets your app access an API on behalf of a user without directly exposing sensitive credentials. It’s as secure as inviting your in-laws over for dinner while keeping your unfiltered opinions locked away in a vault.
Use Case: When to Choose Authorization Code Flow
This flow shines when you’re dealing with apps that require a high level of security, like server-side applications. Imagine you’re building a financial app. You don’t want to be the developer who accidentally exposed everyone’s banking details, do you?
If your app needs to make API requests on behalf of a user, whether it’s retrieving their email contacts or posting a witty status update for them, this flow ensures you’re handling things with a level of security your security team won’t roll their eyes at.
How the Authorization Code Flow Works
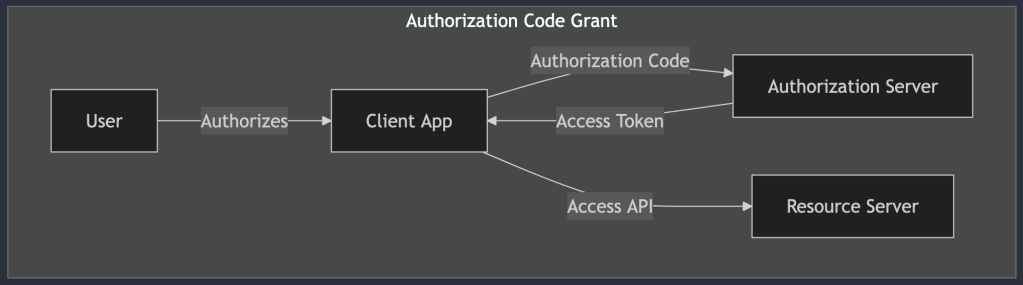
Okay, let’s walk through this with a bit more detail (and hopefully less confusion). The Authorization Code Flow has a few moving parts:
- The User Authorizes Your App: It starts when your app asks the user for permission to access their data. You redirect the user to an external authorization page (let’s say Google’s), where they see what your app is requesting. At this point, the user either grants or denies access.
- The Authorization Code: If the user grants access, the Authorization Server (e.g., Google’s) redirects them back to your app with an authorization code in the URL. Think of this code as a secret handshake that says, “Yes, this app got the user’s permission. Proceed.”
- The Exchange: Here’s where the magic happens. Your app’s backend (server-side component) takes that authorization code and sends it to the Authorization Server, along with some other secret credentials (like a client ID and client secret). In return, the server gives your app an access token.
- Using the Access Token: Now, your app can use the access token to make secure API requests on the user’s behalf.
Why This Flow Is Secure
Here’s the genius part: the access token never touches the user’s browser or gets exposed to any potential attackers lurking in the front end. By performing the token exchange server-side, you minimize the risk of someone stealing the access token. It’s like leaving your valuables in a safety deposit box rather than flaunting them at a busy street fair.
To be clear: This isn’t just a “nice-to-have” feature. If you’re building a web app that values security, this flow is non-negotiable. You get the access token only after the user has securely authenticated, and all exchanges happen away from the potential dangers of the browser environment.
Check a practical example of this workflow authenticating an Spring Boot backend with Google using an Angular frontend.
Implicit Code Grant
Next up, we have the Implicit Code Grant. It’s the kind of OAuth2 flow you’d use when building client-side applications that don’t have much backend support—think simple single-page apps or front-end-heavy applications. But before you get too excited, let me drop this disclaimer: the Implicit Code Grant is like that outdated software library you know you should replace but haven’t gotten around to yet. It works… but just barely, and using it comes with a list of risks.

Use Case: When (and Why) to Use It
The Implicit Code Grant was designed for situations where the client (i.e., your app) didn’t have a secure way to store secrets or perform backend exchanges. So, the flow skips the server-side token exchange and delivers the access token straight to the client. Convenient? Sure. Safe? Not so much.
This flow is like ordering a valuable package and having it left on your front porch in broad daylight. Sure, it might work fine in a nice neighborhood with little traffic, but if there are any would-be thieves (or malicious attackers) hanging around, you’re asking for trouble. Because of these security issues, the Implicit Code Grant is falling out of favor and is actively being phased out.
Use the Implicit Code Grant only if you absolutely have to, and preferably for non-critical applications. Even then, you should have a plan to upgrade to something more secure, like PKCE, in the near future.
How the Implicit Code Grant Works
The Implicit Code Grant skips a few steps compared to the Authorization Code Flow. Here’s a simple breakdown:
- The User Authorizes Your App: Just like in the other flows, your app redirects the user to an external authorization page to get permission to access their data.
- Direct Token Delivery: Once the user grants permission, the Authorization Server sends the access token directly back to your app in the URL. No server-side exchanges, no safety net.
- Access Token in the Wild: Your app can now use the access token to make API requests. But since the token is immediately exposed in the URL, any malicious script or prying eye could potentially intercept it.
Why It’s Risky Business
The Implicit Code Grant has a reputation for being risky, and rightfully so. Let’s talk about a few of the reasons it’s not as secure as other flows:
- Token Leaks: Since the access token is sent directly to the client and is often exposed in the browser’s address bar, it’s vulnerable to interception or being accidentally logged. Imagine a browser extension silently grabbing that token—scary, right?
- Token Storage: With no backend to store the token securely, developers often resort to storing it in local storage or session storage, which is not ideal. If a malicious script gets access to that storage, it’s game over.
- Short Token Lifespan: To mitigate some of these risks, access tokens issued through this flow often have a very short lifespan. But even then, it’s like putting a bandage on a broken dam.
OAuth2 best practices now recommend moving away from the Implicit Code Grant in favor of more secure flows, like the Authorization Code Flow with PKCE. Standards bodies and security experts have emphasized that modern client-side apps should no longer rely on this outdated method.
Client Credentials Grant
Ah, the Client Credentials Grant, the no-nonsense, straight-to-the-point OAuth2 flow. If the Authorization Code Grant is the meticulous accountant of the OAuth world, the Client Credentials Grant is more like a well-oiled factory conveyor belt, designed specifically for machine-to-machine communication. It’s simple, efficient, and, most importantly, secure. No messy user authorizations, no awkward redirects, just backend systems getting the job done.
Use Case: Machine-to-Machine Communication
This grant type is your go-to choice when two backend systems need to talk securely. Whether it’s a payment processing system verifying transactions with a bank’s API or a microservice querying a database service, the Client Credentials Grant makes these connections seamless and efficient. Basically, if there’s no user involved and it’s all about your applications accessing resources on their own behalf, this is the flow you want.
Imagine an internal API where your services authenticate with each other to exchange data. No users waiting around, no need for consent screens, just reliable, automated communication between your apps.
How the Client Credentials Grant Works
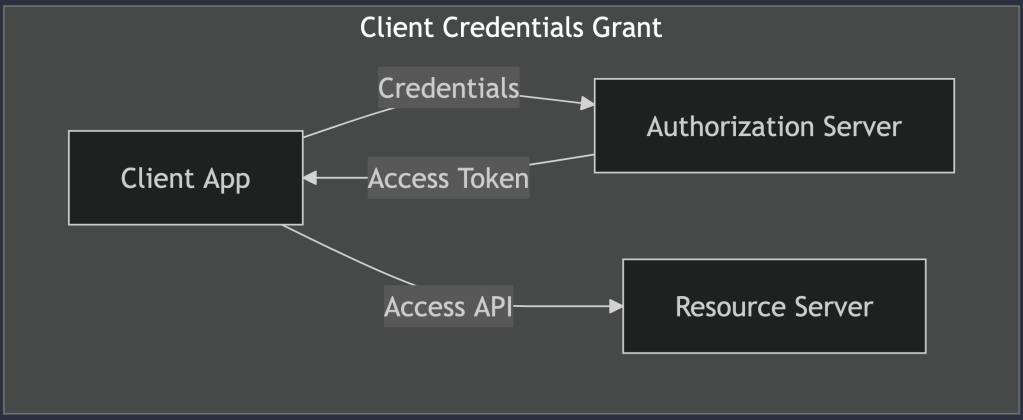
Let’s break down how this flow operates in its beautifully simple form:
- Application Authentication: Your application sends a request to the Authorization Server with its own credentials, typically a
client_idand aclient_secret. - Token Reception: If the credentials check out, the Authorization Server responds with an access token. This token allows your app to make API requests on behalf of itself, without needing any user involvement.
- Accessing Resources: Armed with the access token, your app can now make authenticated API requests. Whether it’s fetching data, performing updates, or initiating background processes, it’s all handled smoothly.
Security Considerations
The Client Credentials Grant is considered highly secure when implemented correctly. Here’s why:
- Confidential Clients Only: This flow is intended for apps that can keep secrets safe, meaning backend systems or services. If you’re considering using this flow in a front-end app that anyone can poke around in, stop right there. Seriously. Don’t do it.
- Limited Token Scope: As with any OAuth flow, you’ll want to limit the scope of the access token to ensure it can only be used for specific tasks. The principle of least privilege is your friend here. Don’t give your app more power than it needs, because with great power comes great… well, you know the rest.
- Credential Management: Make sure to store your client secrets securely, using encrypted environments or secrets management tools. If your secrets were a physical key, this is where you’d avoid leaving it under the doormat.
When to Use Client Credentials Grant
This grant type shines in scenarios where you need automated, behind-the-scenes communication between services. Here are a few examples:
- Microservice Architectures: Picture a setup where your frontend sends a request to a backend service, which then talks to several other microservices. The backend service can use the Client Credentials Grant to authenticate itself and retrieve data from those other microservices.
- Automated Data Sync: Need to sync data between two systems regularly? Set up one of them to authenticate and pull data using this grant, and voilà—no user approval needed.
- Internal Service APIs: If you’re developing a suite of internal APIs that talk to each other, this grant keeps things tidy and secure.
Resource Owner Password Credentials Grant
If this flow were a piece of technology, the Resource Owner Password Credentials Grant would be the flip phone of OAuth2, useful back in the day, but now a bit too risky and outdated for modern use. Yet, for some legacy applications or special use cases, it still manages to hang on. So, let’s give it a fair (but cautious) review.
Use Case: Legacy or Highly Trusted Applications
Imagine a scenario where an application is so trusted that users feel comfortable handing over their username and password. No middleman, no redirect dance, just raw credential-sharing between the user and the app. In this flow, the app directly collects the user’s credentials and exchanges them for an access token, granting it access to protected resources on behalf of the user.
While that might sound convenient, it’s also a security nightmare waiting to happen. Think of it as borrowing a friend’s password to log into their account for something important. Sure, you have a legitimate reason, but there’s a lingering discomfort, and for good reason.
How the Resource Owner Password Credentials Grant Works
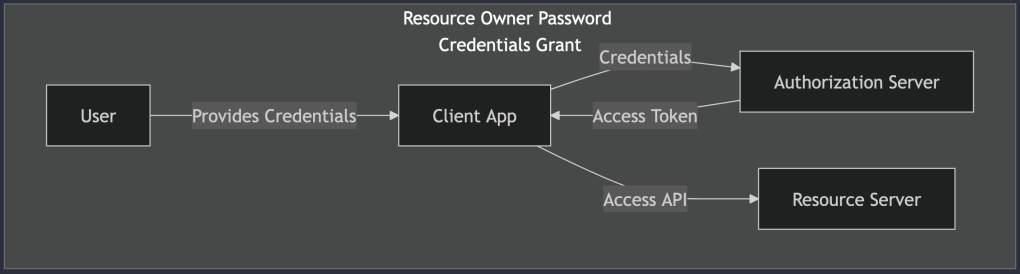
Here’s a quick breakdown of how this flow functions:
- User Provides Credentials: The user types in their username and password directly into the app. This step should make security-conscious developers break into a cold sweat, and rightfully so.
- Token Exchange: The app then sends these credentials to the Authorization Server in exchange for an access token.
- Token-Based Access: With the token in hand, the app can make API requests on behalf of the user. At this point, the user’s credentials are no longer needed, but the initial exposure has already happened.
When (If Ever) You Should Use It
There are rare occasions where this flow is acceptable. Perhaps you’re working on a legacy system that can’t be easily refactored, or you have a highly trusted application in a controlled environment. Even then, tread carefully. Here are some potential scenarios:
- Legacy Systems: If you’re maintaining an older application that predates modern OAuth2 flows, you might have no choice but to use this grant. Plan a migration path if you can.
- Internal Apps: For applications that never leave your organization’s secure network and have no external exposure, the risks are somewhat mitigated.
Security Considerations
If you must use the Resource Owner Password Credentials Grant, make sure to follow these security best practices:
- Encrypt Everything: Transmit credentials over HTTPS, and make sure your servers are hardened against common vulnerabilities.
- Use Minimal Permissions: Limit the scope of the access token to the bare minimum needed for the app to function. There’s no need to give your app access to every corner of the user’s account.
- Educate Users: If your app absolutely requires direct credential entry, be transparent with users about why this is necessary and how you’re keeping their data secure.
Modern Alternatives
For most new applications, you’re far better off using more secure flows, like the Authorization Code Grant (with PKCE if it’s a public client). These modern approaches reduce the risk of credential exposure and align with best practices for user authentication.
So, is this grant outdated? Absolutely. But in a world where some legacy systems still linger, it’s good to understand what it is, why it was once used, and why it should mostly stay in the past. If you can’t phase it out just yet, at least implement it with an abundance of caution.
Device Authorization Grant
The Device Authorization Grant, the saving grace for all those devices that refuse to come with a proper keyboard. You’ve seen it in action if you’ve ever tried signing into a smart TV or an IoT device. You know the drill: a cryptic code appears on the screen, and you’re prompted to visit a separate website on your phone or laptop to complete the login process. It’s a bit like finding yourself lost in the maze of a streaming service setup menu, wondering why remote controls don’t come with built-in QWERTY keyboards.
Despite the slight inconvenience, this flow is a secure and clever workaround for devices with limited input capabilities. Here’s how it works and why it’s the perfect fit for our favorite screen-limited gadgets.
Use Case: Devices with Limited Input Capabilities
The Device Authorization Grant is designed for situations where a device (say, a smart fridge, a TV, or your latest IoT experiment) needs to authenticate a user but lacks a straightforward way to collect a username and password. Imagine the frustration of typing out your email and a 16-character password on a tiny remote control. Not fun.
Instead of forcing users to fumble through that ordeal, this flow introduces a two-step process that’s as simple as it is effective. The device provides a short code, the user authorizes the device on a more input-friendly device (like their smartphone or laptop), and voilà, access granted.
How the Device Authorization Grant Works
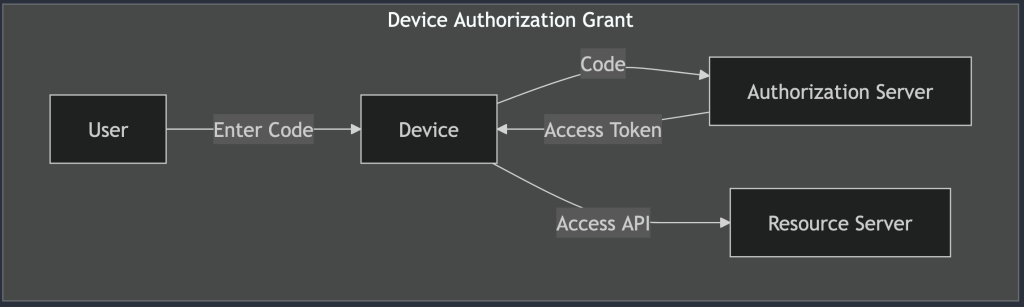
Let’s break down the magic behind this user-friendly flow:
- Device Code Request: The limited-input device initiates the process by sending a request to the Authorization Server. In return, it receives a
device_code(used for polling) and auser_code(the short, human-friendly code shown to the user), along with a URL for user authorization. - User Authorization: The device displays the
user_codeand the authorization URL, instructing the user to open that URL on a more convenient device (like their phone). Think of it as the device saying, “I’m not built for this, so please do the hard work elsewhere.” - User Interaction: The user visits the URL, logs in if necessary, and grants permission for the limited-input device to access their account. It’s the digital equivalent of a permission slip, but with fewer parental signatures.
- Device Polling: Meanwhile, the limited-input device keeps polling the Authorization Server at regular intervals, asking, “Am I good to go yet?” Once the user has granted access, the server responds with an access token.
- Access Granted: Armed with the access token, the device can now access protected resources on behalf of the user. No passwords entered on awkward interfaces, no hair-pulling frustration, just smooth, token-based access.
Why It’s Effective
The Device Authorization Grant is a win-win for both security and user experience. Here’s why:
- Secure: By offloading the user authentication to a more secure and input-friendly device, this flow minimizes the risk of credentials being intercepted or compromised.
- User-Friendly: Let’s face it, nobody enjoys typing on a TV remote. This flow simplifies the login process, letting users authenticate in seconds on their phones or laptops.
Security Considerations
Although this flow is generally secure, there are a few best practices to keep in mind:
- User Code Expiration: The
user_codedisplayed on the device should have a limited lifespan to prevent unauthorized use. Users should be given clear instructions to act quickly. - Rate Limiting: The device’s polling should be rate-limited to avoid overwhelming the Authorization Server.
- Token Scope: As with any access token, it’s important to limit the scope to only the necessary permissions.
Real-World Examples
You’ve probably encountered this grant type more times than you realize:
- Smart TVs: You’re setting up a new streaming service, and the TV prompts you to go to a URL on your phone.
- Game Consoles: Xbox and PlayStation use this flow for logging into your account. The console shows a code, and you authorize it on a separate device.
- IoT Devices: From smart thermostats to connected home assistants, any device that isn’t optimized for user input can benefit from this approach.
PKCE
Ah, PKCE (pronounced “pixy,” because of course something this complicated would have a cute-sounding name). If the Authorization Code Grant is like a padlock keeping your data secure, PKCE adds an extra layer of titanium and maybe some secret handshakes for good measure. It’s a twist designed for mobile and public clients that can’t securely store secrets, like the apps living in your phone that are always one accidental tap away from chaos.
Use Case: Mobile and Public Clients
PKCE is the go-to solution when you need a more secure way to implement the Authorization Code Grant but don’t have the luxury of secure server-side storage. It’s perfect for scenarios where an app can’t hide its secrets (looking at you, mobile apps). Think of it as the lock that keeps those sneaky hackers from intercepting your data and running away with your tokens.
This flow was built with mobile apps and public-facing clients in mind, providing the extra protection they desperately need. Because when you’re working on a project with potential vulnerabilities, a simple “trust me, it’s secure” just won’t cut it.
How PKCE Works
Let’s unpack this extra layer of security magic:
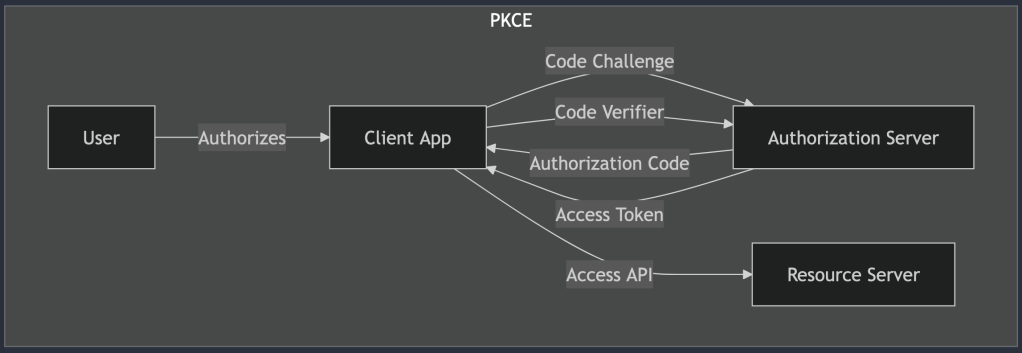
- Code Challenge Generation: Before anything happens, the client generates a
code_verifier, a random string of characters. Using a hashing algorithm (usually SHA-256), it then creates acode_challenge. Thecode_challengeis what’s sent to the Authorization Server, while thecode_verifieris kept secret on the client side (but don’t worry, we’ll use it soon). - Authorization Request: The client initiates the authorization process, sending the
code_challengealong with the usual request to the Authorization Server. If anyone tries to intercept this request, they’ll only see the hashed version, not the originalcode_verifier. - Authorization Code: The user logs in and authorizes the app, and the Authorization Server responds with an authorization code.
- Token Request with Code Verifier: Now, here’s where the magic happens. The client exchanges the authorization code for an access token, but it also sends the
code_verifier. The Authorization Server checks thecode_verifieragainst the previously sentcode_challengeto ensure they match. - Access Granted: If everything checks out, the Authorization Server hands over the access token, and the app is finally able to access the user’s resources.
Why PKCE Is More Secure
The beauty of PKCE is that it prevents certain attack vectors, like authorization code interception. Without PKCE, a malicious app could intercept the authorization code and use it to gain unauthorized access. With PKCE, even if the code is intercepted, the attacker won’t have the matching code_verifier needed to exchange it for a token. It’s like having a two-factor authentication process but for your API requests.
When to Use PKCE
If you’re building:
- Mobile Apps: Apple and Android app stores strongly encourage (or even require) PKCE for apps that use OAuth2.
- Single-Page Applications (SPAs): When your frontend app, done in React or Angular, needs to call an API on behalf of the user, PKCE is your go-to security feature.
- Any Public Client: Essentially, if your app can’t hide secrets and you care about security (and you should), PKCE is your friend.
Conclusion
Now that you’ve got the theory down, what does this look like in a real app? When you’re integrating with a service like Google or GitHub, the docs often spell out the steps clearly. However, the devil is in the details, like ensuring PKCE is enabled or double-checking your redirect URIs.
OAuth2 implementation can be surprisingly straightforward (or a giant pain) depending on how well you plan and understand the flows. Testing, reading official documentation, and keeping an eye on security practices will save you a lot of headaches.

Leave a comment