
Recently, I needed to create an authentication system for one of my applications. But I need to create it quickly and securely. I may use a JWT with email and password, but people are lazy creating new passwords. So, I choose for a social Sign-In with AWS Cognito.
I have another post where I authenticate a Spring Boot application using directly Google. But it requires some custom configuration with Spring Security.
Explanatory video.
Github repository.
OAuth2 Workflow
With this configuration, AWS Cognito will act as a the authorization server. And behind, I will have the actual OAuth2 authorization server, which is Google.
My application is composed by a backend made with Spring Boot and Spring Security, and a frontend made with React. The backend is configured as a resources server. And the frontend has no responsibility in the authentication, it only redirects the requests to the backend.

Here are the steps to authenticate a user:
- At the frontend’s login page, a request is done to backend to get a URL to authenticate. This URL allows the user to authenticate using the login page of Cognito;
- Once the user clicks on the authentication URL, he’s redirect to the login page of Cognito;
- With the credentials sent by the user, Cognito verifies with authentication systems connected, Google in this case, if everything is correct;
- Once correctly authenticated, Cognito requests a callback URL with a code. This callback URL is configured in the frontend. But as the frontend has no information about the authentication, it redirects the code to the backend;
- The backend validates the code against Cognito. If the code is valid, Cognito returns a JWT;
- The JWT is now returned to the frontend and stored in the Localstorage or in a cookie. This JWT is sent by the frontend in the Authorization Bearer HTTP header to the backend;
- Spring Security reads the JWT and checks its validity against the authorization server configured.
Let’s start configuring the Google client.
Google Client
The first thing I need to configure when I first want to add a Google Client, is the consent screen. The consent screen is the screen displayed when I select a Google account, and which says which application is trying to access my account and what information will be requested.
Going to the GCP console, I can easily configure the consent screen at APIs & Services -> OAuth consent screen. In the first screen, I only add the name of my application, the logo, the contact email and some URLs of my web application. The authorized domains will be automatically added with the actions I do in the following minutes.
And in the second screen, I choose the scopes requested. I must select the following to obtain a read access to the profile of the logged user: userinfo.email, userinfo.profile and openid.
Once done, I can create my Google client. The Google OAuth2 Client will be the application which allows an external application to read information from a Google account. I can add a Google client in the AWS console at APIs & Services -> Credentials. Here I create an OAuth Client ID. I select a Web Application.
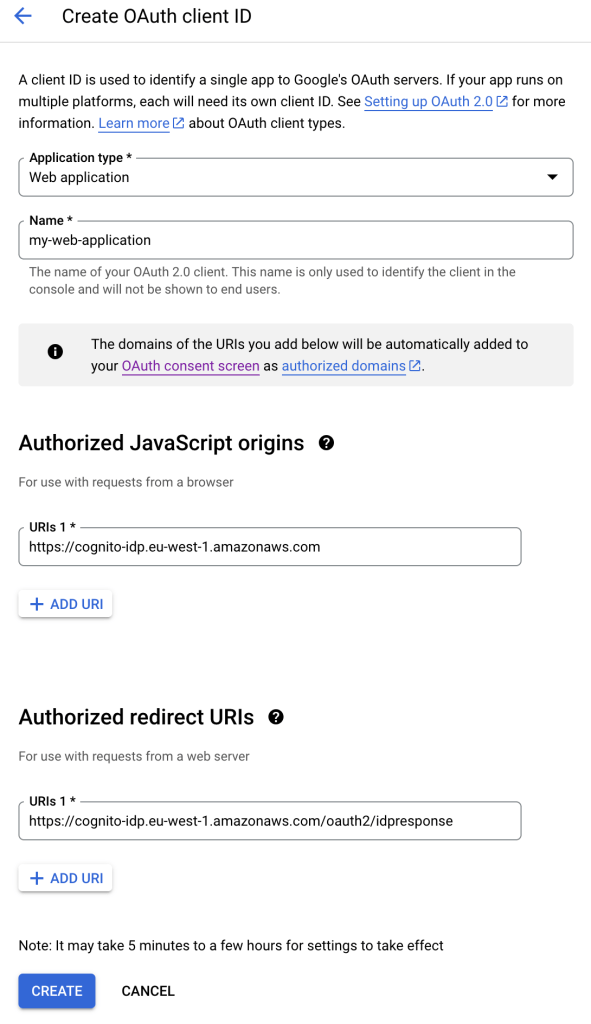
In the authorized origins and redirect URIs, I add the AWS Cognito URL, as my application won’t communicate directly with Google.
Once created, I will have a client ID and client secret that I can copy for later.
Let’s now build the React application.
React Application
Let’s start with the Login component. It displays a Sign In button with the Cognito’s URL. And the Cognito’s URL comes from the backend.
export const LoginPage = () => {

    const [cognitoUrl, setCognitoUrl] = useState<string>('');

    useEffect(() => {
        httpService.fetch({url: '/auth/url'})
            .then(response => response.json())
            .then(data => {
                setCognitoUrl(data.url);
            });
    }, []);

    return (
        <div>
            <Button onClick={() => {window.location.href = cognitoUrl;}}>Sign in with Google</Button>
        </div>
    );
};

export default LoginPage;
Let’s continue with the Redirect component. This one is for the callback after the authentication succeeds. With the callback request, the frontend receives a code. But as my frontend has nothing to do with the code, it is sent to the backend.
export function RedirectPage() {

    const navigate = useNavigate();

    useEffect(() => {
        const urlParams = new URLSearchParams(window.location.search);
        const code = urlParams.get('code');
        httpService.fetch({url: `/auth/callback?code=${code}`})
            .then(response => response.json())
            .then(data => {
                AppActions.setAuthToken(data.token);
                navigate('/private', { replace: true })
        });
    }, []);

    return (
        <div>
           <div>Correctly logged</div>
        </div>
    );

};

export default RedirectPage;
The Private component requests a private endpoint of the backend, displaying protected information.
export function ProtectedPage() {

    const [content, setContent] = useState("");

    useEffect(() => {
        httpService.fetchWithAuth({url: '/private'})
            .then(response => response.json())
            .then(data => {
                setContent(data.message);
            });
    }, []);

    return (
        <div>
            <div>Protected content:</div>
            <div>The server says: {content}</div>
        </div>
    );
}

export default ProtectedPage;
Until now, all the requests were made with an HttpService. This service has only two methods, one to request public endpoints of the backend, and one to request protected endpoints of the backend.
When requesting public endpoint, I only use the fetch method. But when I want to request protected endpoints, I need to send the Authorization HTTP header with the request. And with the header, the JWT received by the frontend.
export const httpService = {
    fetch: async ({ url, options }: THttpArgs): Promise<any> => {
        return await fetch(`http://localhost:8080${url}`, options);
    },
    fetchWithAuth: async ({ url, options }: THttpArgs): Promise<any> => {
        AppActions.getLocalStorageAuthToken();
        const optionsWithAuth = {
          ...options,
          headers: {
            ...options?.headers,
            Authorization: `Bearer ${AppStore.authToken}`,
          },
        };
        return await fetch(`http://localhost:8080${url}`, optionsWithAuth);
    }
};

export default httpService;
In the previous code, I use the actions and stores of React to store the JWT. If you want more details about those React components, check the Github repository of the project.
Let’s now continue with the Spring Boot backend.
Spring Boot Application
Let’s start with the Authentication controller. This controller has two endpoints. The first one is to generate the Cognito’s URL to sign in. And the second endpoint is the one to validate the code and return the JWT.
@RestController
public class AuthController {

    @Value("${spring.security.oauth2.resourceserver.jwt.clientId}")
    private String clientId;

    @Value("${spring.security.oauth2.resourceserver.jwt.clientSecret}")
    private String clientSecret;

    @Value("${auth.cognitoUri}")
    private String cognitoUri;

    private static final ObjectMapper JSON_MAPPER = new ObjectMapper();

    @GetMapping("/auth/url")
    public ResponseEntity<UrlDto> auth() {
        String url = cognitoUri +
                "/oauth2/authorize?" +
                "response_type=code" +
                "&client_id=" + clientId +
                "&redirect_uri=http://localhost:4200/oauth2/idpresponse" +
                "&scope=email+openid+profile";
        return ResponseEntity.ok(new UrlDto(url));
    }

    @GetMapping("/auth/callback")
    public ResponseEntity<TokenDto> callback(@RequestParam("code") String code) throws URISyntaxException {

        String urlStr = cognitoUri + "/oauth2/token?"
                + "grant_type=authorization_code" +
                "&client_id=" + clientId +
                "&code=" + code +
                "&redirect_uri=http://localhost:4200/oauth2/idpresponse";

        String authenticationInfo = clientId + ":" + clientSecret;
        String basicAuthenticationInfo = Base64.getEncoder().encodeToString(authenticationInfo.getBytes());

        HttpRequest request;
        try {
            request = HttpRequest.newBuilder(new URI(urlStr))
                    .header("Content-type", "application/x-www-form-urlencoded")
                    .header("Authorization", "Basic " + basicAuthenticationInfo)
                    .POST(HttpRequest.BodyPublishers.noBody())
                    .build();
        } catch (URISyntaxException e) {
            throw new RuntimeException("Unable to build Cognito URL");
        }

        HttpClient client = HttpClient.newHttpClient();

        HttpResponse<String> response;
        try {
            response = client.send(request, HttpResponse.BodyHandlers.ofString());
        } catch (IOException | InterruptedException e) {
            throw new RuntimeException("Unable to request Cognito");
        }

        if (response.statusCode() != 200) {
            throw new RuntimeException("Authentication failed");
        }

        CognitoTokenResponseDto token;
        try {
            token = JSON_MAPPER.readValue(response.body(), CognitoTokenResponseDto.class);
        } catch (JsonProcessingException e) {
            throw new RuntimeException("Unable to decode Cognito response");
        }

        return ResponseEntity.ok(new TokenDto(token.id_token()));
    }
}
The Cognito’s URL is built concatenating the Client Id of Cognito and the OAuth2 workflow type.
And to validate the code received by Cognito, I need to send it back to Cognito. But the request must be authenticated using a Basic Authentication composed by the Client Id and the Client Secret.
Let’s take a look at the Spring Security configuration.
@Configuration
@EnableWebSecurity
public class SecurityConfig {

    @Bean
    public CorsConfigurationSource corsConfigurationSource() {
        CorsConfiguration configuration = new CorsConfiguration();
        configuration.setAllowedOrigins(Arrays.asList(
                "http://localhost:4200"
        ));
        configuration.setAllowedMethods(Arrays.asList("GET", "POST", "OPTIONS"));
        configuration.setAllowedHeaders(Arrays.asList("authorization", "content-type"));
        UrlBasedCorsConfigurationSource source = new UrlBasedCorsConfigurationSource();
        source.registerCorsConfiguration("/**", configuration);
        return source;
    }

    @Bean
    public SecurityFilterChain securityFilterChain(HttpSecurity http) throws Exception {
        http
                .cors(c -> c.configurationSource(corsConfigurationSource()))
                .csrf(AbstractHttpConfigurer::disable)
                .exceptionHandling(customizer -> customizer.authenticationEntryPoint(new HttpStatusEntryPoint(HttpStatus.UNAUTHORIZED)))
                .sessionManagement(c -> c.sessionCreationPolicy(SessionCreationPolicy.STATELESS))
                .authorizeHttpRequests((authorize) -> authorize
                        .requestMatchers("/auth/**", "/public").permitAll()
                        .requestMatchers(HttpMethod.OPTIONS, "/**").permitAll()
                        .anyRequest().authenticated()
                )
                .oauth2ResourceServer(c -> c.jwt(Customizer.withDefaults()));
        ;
        return http.build();
    }

}
First, I build a Bean to configure the CORS. As I have a separate frontend from by backend, I need to allow the frontend to request my backend with the CORS.
Then, in the Spring Security configuration, I indicate which are the public and protected endpoints, with some standard configuration.
But the most important is the last line where I indicate that my backend acts as a resource server with a JWT.
Now, I can build a protected endpoint.
@RestController
public class PrivateController {

    @GetMapping("/private")
    public ResponseEntity<MessageDto> privateMessages(@AuthenticationPrincipal Jwt jwt) {
        return ResponseEntity.ok(new MessageDto("Hello " + jwt.getClaim("name")));
    }
}
In this endpoint, I use the AuthenticationPrincipal annotation to have access to the JWT sent by Cognito. Inside the token, I can read some claims as the name. To see the complete decrypted JWT, I can paste it into jwt.io.
Finally, to let my backend act as a resource server, I need to put some information the Cognito client in the application.yml file.
auth:
  cognitoUri: <>

spring:
  security:
    oauth2:
      resourceserver:
        jwt:
          clientId: <>
          clientSecret: <>
          jwk-set-uri: <>
          issuer-uri: <>
And the last step is the configuration of AWS Cognito.
AWS Cognito User Pool
The AWS Cognito User Pool is the OAuth2 Client of AWS. It will be the service where Google will be connected. My application will request the authentiction to AWS Cognito, and AWS Cognito will confirm the authentication with Google. If I add more social sign-in systems, my application won’t need any change, it’s all done in AWS.
The creation of an AWS Cognito user pool has 6 steps. Let’s see all of them.
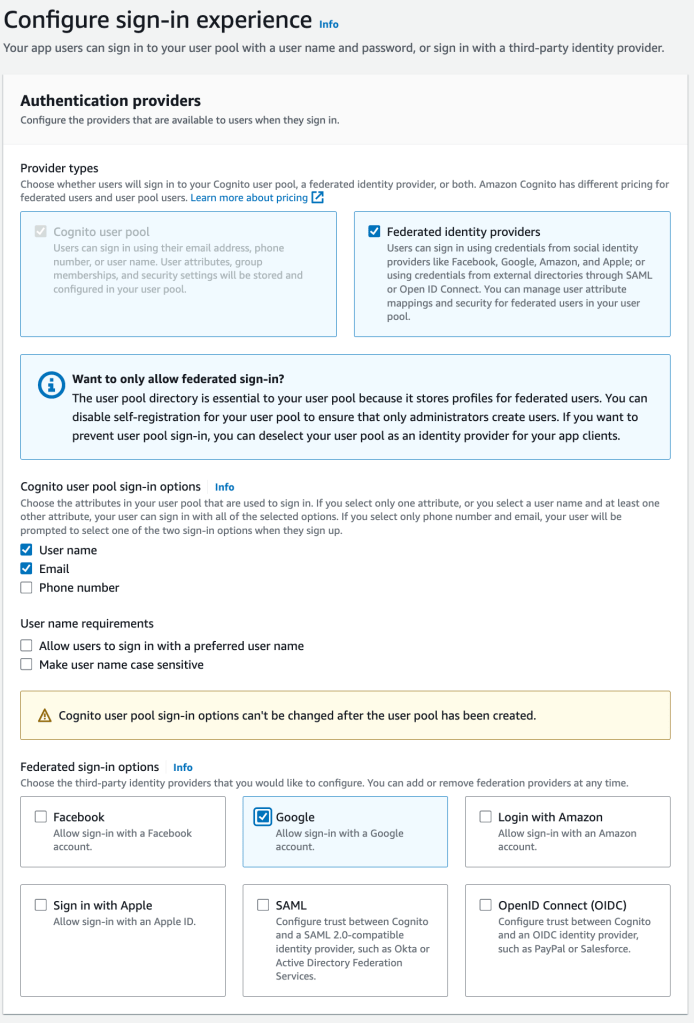
In the first step, I indicate that I want to create a User Pool with a social Sign-In. Then I choose Google.
In the second step, I configure the password management. AWS Cognito also allows me to create new users with no social Sign-In.

In the third step, I indicate if I allow AWS Cognito to Sign-Up users without any social Sign-In system.
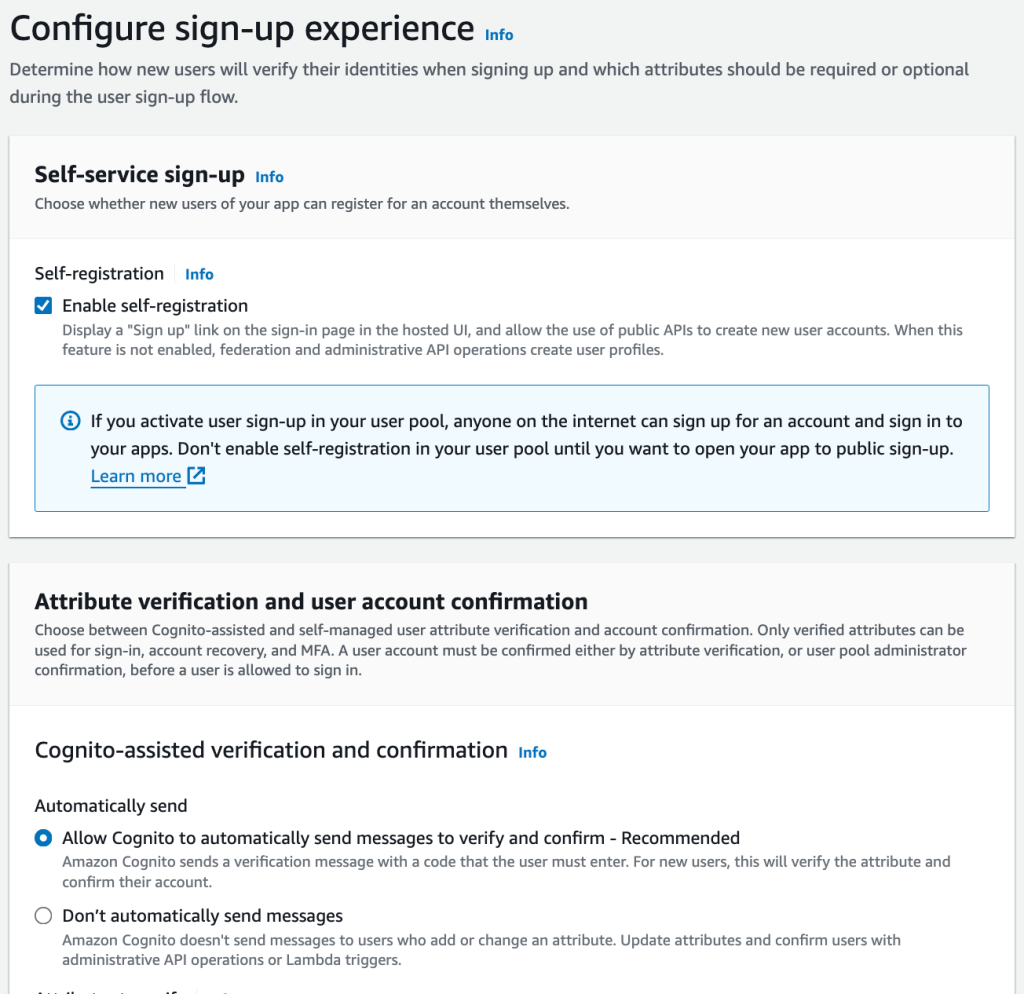
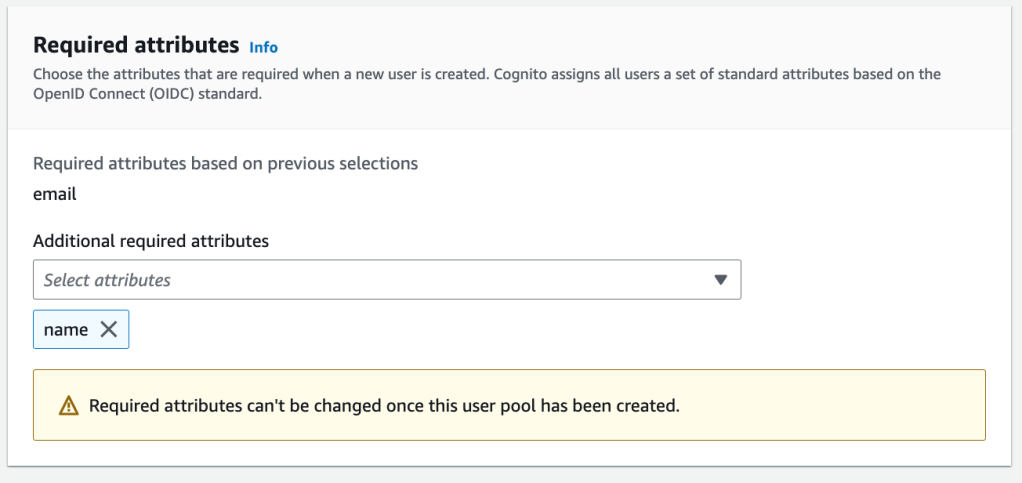
When a user Signs-Up, I indicate which are the fields requested: the email and the name.
The fourth step is the email configuration to validate an account. For simplicity, I let Cognito manage all the emails.

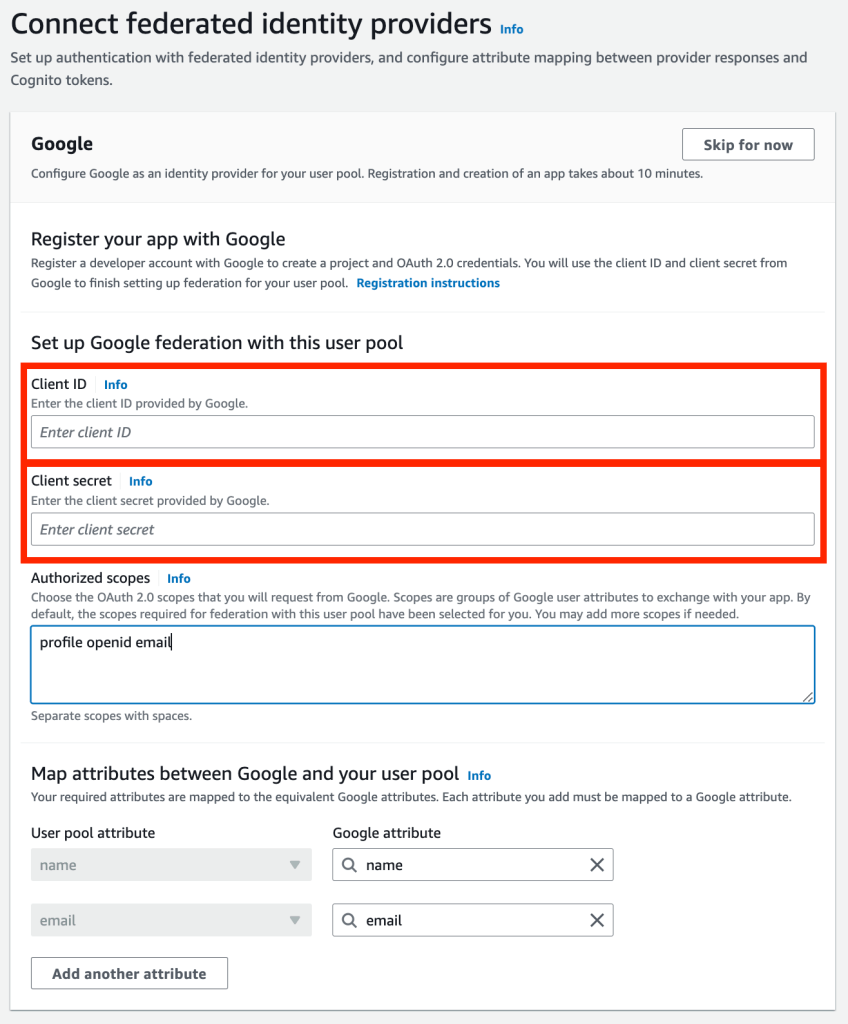
The fifth step is where I connect Google with AWS Cognito. Here I paste the Client Id and Client Secret of Google. Following, I indicate which are the scopes requested: profile, openid and email.
The last step is the way I use the AWS Cognito Client. I start indicating the same and a URL for the Sign-In form.

I must also add the Cognito Domain to the authorized URLs into the Google Client configuration.
And finally, I indicate how I will use the AWS Cognito Client, as with server-side application. This will generate a Client Id and a Client Secret I will use in my Spring Boot application.
Bellow, I indicate the callback URL, this time is the frontend’s URL.

At the end, AWS shows a summary of all the steps.
Conclusion
The advantage of using AWS Cognito, it that it has by itself an authentication system. And I can connect any social login with a matter of configuration.

Leave a comment