
This is the first article of a series where I will create a Fullstack application. When creating a Fullstack application I must take into account the behavior between a Frontend application and a Backend application. The data transmitted, where goes the logic, the security…
In this first article, I will start by creating the Spring Boot application and configure the CORS to be accessible by any Frontend (Angular or React).
The content:
- Dependencies needed in a Spring Boot application
- Create my first endpoint
- The CORS configuration to allow a Frontend communication
- The Aspect configuration for error management
Create The Spring Boot Project
First step, go to Spring Initializr.
Here, I will create my Spring Boot project. Spring Initializr is website which creates me Spring Boot application with all the initial configuration, ready to be used.
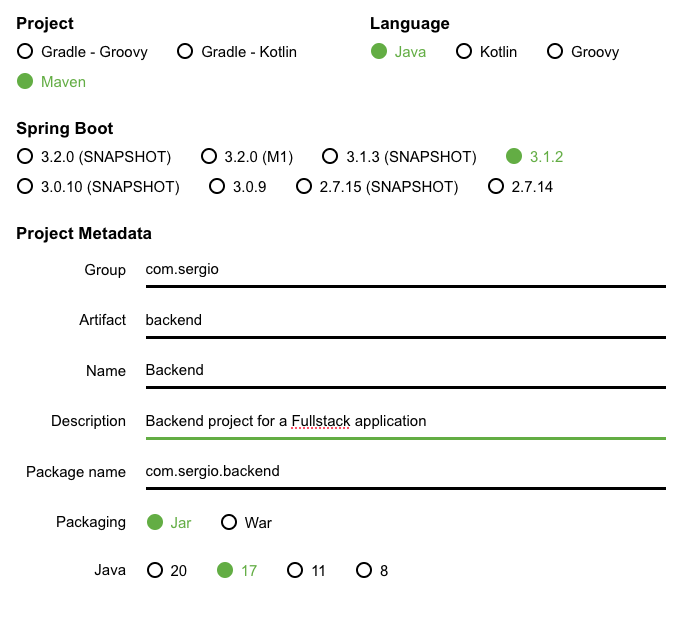
I must set the Maven Group and Artifact. The name of the project and a description.
I select the Maven dependency management, the Java language, the latest stable Spring Boot version, the latest stable Java version and a Jar packaging.
On the other side, I can choose the dependencies I want in my project.
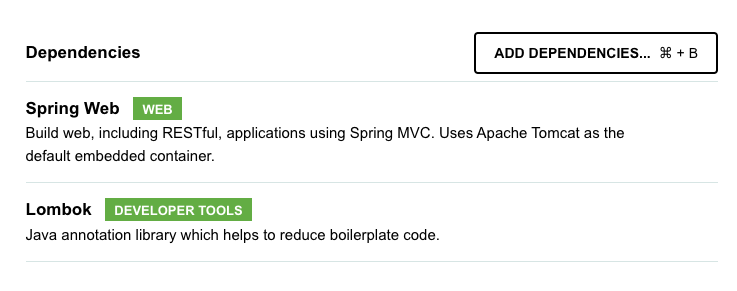
I will start by the Spring Web dependency, as I want my Spring Boot application to have endpoint and communicate with Web requests.
Then, I’ve added Lombok to generate some code. I will also add Mapstruct, but this one isn’t available at Spring Initializr. I will add it manually later.
Now, I’m ready to hit the Generate button and download the project.
As soon as I open the project in IntelliJ (or any other IDE), I will add the Mapstruct dependency.
        <dependency>
			<groupId>org.mapstruct</groupId>
			<artifactId>mapstruct</artifactId>
			<version>1.5.3.Final</version>
		</dependency>
		<dependency>
			<groupId>org.mapstruct</groupId>
			<artifactId>mapstruct-processor</artifactId>
			<version>1.5.3.Final</version>
		</dependency>
Make sure to put the Mapstruct dependency after the Lombok one. Because Mapstruct needs the code generated by Lombok.
My project is created. Let’s take a look at the files structure.

Spring Initializr created me the src folder where I can place all my code. Inside, I have the main folder and the test folder, to separate the production code from the unit tests. Then, I have the java folder with all the Java code, and the resources folder where I can place all the configuration files and resources files.
Finally, I also have the HELP.md file which gives me some resources to start developing my application. I can remove it as soon as I start, and create a README.md file instead with some information about the project.
As I choose Maven as the dependency management tool, I have the pom.xml file where are located all the dependencies of the project. I also have the mvnw (and mvnw.cmd for Windows users) file which is the Maven wrapper. I don’t need to have Maven installed in my laptop, just by running this wrapper is enough.
So, first command to build my project:
./mvnw clean package
And to start the project:
./mvnw spring-boot:run
My First Endpoint
Let’s start by creating the Java packages necessary.
Inside com.sergio.backend, I will create the controllers package. In plural, as it will contain many controllers. And inside I create my first controller, GreetingsController.java. The controllers, services, repositories and entities are always in singular.
@RestController
public class GreetingsController {

    @GetMapping("/greetings")
    public ResponseEntity<ContentDto> greetings() {
        return ResponseEntity.ok(new ContentDto("Hello from backend!"));
    }
}
First, I configure the controller as a REST controller with the annotation @RestController. This allows me to communicate in JSON, to convert objects in JSON format and viceversa.
When creating the endpoint, I can define the HTTP method directly with the annotation used. Using @GetMapping will map the method to a GET operation. And inside the annotation, I put the route to map.
Let’s take a look to the return type of the method, ResponseEntity<ContentDto>. ContentDto is an object I will create soon. As said, a REST controller allows me to convert objects into JSON. This means that it will transform the ContentDto object into JSON. And this is done because of the REST controller annotation and the ResponseEntity object.
And finally, the return value. I want to return “Hello from backend!” but inside a JSON object. First, I instantiate ContentDto with the value I want. Second, I wrap my dto with ResponseEntity.ok. The ok means a 200 HTTP response code with the given content.
Let’s see the result when calling this endpoint from a terminal.
backend git:(main) curl localhost:8080/greetings -vvv
*   Trying 127.0.0.1:8080...
* Connected to localhost (127.0.0.1) port 8080 (#0)
> GET /greetings HTTP/1.1
> Host: localhost:8080
> User-Agent: curl/7.88.1
> Accept: */*
>
< HTTP/1.1 200
< Vary: Origin
< Vary: Access-Control-Request-Method
< Vary: Access-Control-Request-Headers
< Content-Type: application/json
< Transfer-Encoding: chunked
< Date: Sat, 19 Aug 2023 08:39:25 GMT
<
* Connection #0 to host localhost left intact
{"content":"Hello from backend!"}%
There is a lot of information. Let’s focus only on some lines.
The first line, is the command I use to send the request to the backend. curl is a command which sends HTTP requests. localhost:8080 is where my Spring Boot application is running. And greetings is the endpoint I’ve created. I’ve added -vvv to display more details about the request.
All the lines which start by > are the information sent to the application. And all the lines which start by < are the information received from the application.
At line 4, I can see that I send a GET request to the endpoint greetings.
And at line 9, I receive an HTTP response code 200 from the application.
Finally, at last line, I have the response of my application, in JSON format. The JSON has this structure (the content field) because of the fields inside the ContentDto object.
So, let’s create the ContentDto object inside a new package dtos.
public record ContentDto(String content) {
}
CORS Configuration
I’ve sent the last request from a terminal. But if I want to request the Backend from a Frontend, I have to adapt my Backend.
By default, the Backend only accepts request from the same URL (localhost:8080). When using a Frontend, like Angular or React, they are running in a different URL (localhost:4200 or localhost:3000). So, Spring Boot will block requests coming from the Frontend. If you want more details about this, check the following video.
So, I need to configure my backend to accept requests from another URL. I’ll start by creating a new package, config. And now the class which will contain the Web configuration, WebConfig.
@Configuration
public class WebConfig {

    @Bean
    public WebMvcConfigurer corsConfig() {
        return new WebMvcConfigurer() {
            @Override
            public void addCorsMappings(CorsRegistry registry) {
                registry.addMapping("/**")
                        .allowedOrigins("http://localhost:4200")
                        .allowedMethods(HttpMethod.GET.name(),
                                HttpMethod.POST.name(),
                                HttpMethod.DELETE.name())
                        .allowedHeaders(HttpHeaders.CONTENT_TYPE,
                                HttpHeaders.AUTHORIZATION);
            }
        };
    }
}
The first annotation, @Configuration, is necessary to let Spring detect and take into account this configuration class.
The @Bean annotation tells also Spring that it must execute and save the result of the following method.
The method returns an instance of WebMvcConfigurer. It’s the behavior of a Web application. There is already a default configuration from Spring (that’s why I get an error). And I want this default configuration but override the CORS configuration. So, I only implement the method addCorsMappings.
I start by adding the impacted routes with addMapping("/**"). With "/**" I tell that I want the following configuration to be applied to all the routes.
Then I indicate the allowed origines, the allowed URLs with allowedOrigins("http://localhost:4200"). This method accepts a list of Spring if I need many URLs from many Frontends.
By default it only accepts the GET HTTP methods. To accept more HTTP methods, I use allowedMethods(...) with all the HTTP methods I want.
And by default it accepts no HTTP headers. But I need my Backend to consume JSON content and some Authorization headers. So, I add allowedHeaders(...) with all the HTTP headers I need.
Aspect Configuration for Error Management
What happens when an exception is thrown in my application? What is returned to the frontend?
I don’t know. And if I don’t know, it’s not good. So let’s handle this behavior.
I will start by creating my own exception in the package exceptions.
public class AppException extends RuntimeException {
    private final HttpStatus status;

    public AppException(String message, HttpStatus status) {
        super(message);
        this.status = status;
    }

    public HttpStatus getStatus() {
        return status;
    }
}
The first thing is to extend RuntimException. This way, I don’t need to surround my exception with a try-catch.
By default, any Java exception has a message field, so I will only add an HttpStatus field. I will use this field to customize the HTTP code returned by my application when an error occurs.
I will use this exception every time I face an incoherent behavior of my application. Like a resource not found, with some validation errors or more.
Let’s now create the aspect with the error management in the config package.
@ControllerAdvice
public class RestExceptionHandler {

    @ExceptionHandler(value = { AppException.class })
    @ResponseBody
    public ResponseEntity<ErrorDto> handleAppException(AppException ex) {
        return ResponseEntity
                .status(ex.getStatus())
                .body(new ErrorDto(ex.getMessage()));
    }

    @ExceptionHandler(value = { Exception.class })
    @ResponseBody
    public ResponseEntity<ErrorDto> handleException(AppException ex) {
        return ResponseEntity
                .internalServerError()
                .body(new ErrorDto("Unknown error"));
    }
}
The class must be annotated by @ControllerAdvice to allow Spring to use it to surround all the endpoints. This way, all the endpoints will call those methods if any exception is thrown.
In the first method I use the annotation @ExceptionHandler() with the value of my own exception, AppException, to catch only my exception. In the second method, I use it with a generic Exception to catch the remaining exceptions. I must be careful to respect the order of the methods, this way, it first checks my own exception and then the generic exception.
Finally, I return a ResponseEntity, as done in the controllers with a new DTO (Data Transfer Object). Let’s end by creating this DTO with a single field.
public record ErrorDto (String message) { }
Conclusion
This simple application allows a communication with a Frontend due to the CROS configuration and handles any exception occurred in the application correctly returning a readable message.
You can find the code of the project in this Github repository.
If you want to learn more about good quality code, make sure to follow me on Youtube.

Leave a comment