
In this post I will show 2 methods to deploy a Python API to AWS Lambda. I will show how to deploy a small Python API quickly, and I will also show how to deploy a big Python API with external dependencies. I will also show how to deploy a Docker image to AWS Lambda.
Content
- Serverless API
- Creating a Lambda
- The Python Script
- Upload the Script to the Lambda
- Script with External Dependencies
- Lambda with Docker
Watch this video for more details.
Serverless API
The AWS Lambdas are a serverless platform to run an application and pay only for the requests. In traditional environments I have to pay 24 hours a day, 7 days a week, to have my server up waiting for the requests. Even if there are no requests.
If I switch to a serverless platform, when there are no requests I pay nothing. And when there are a million requests per day, my Lambdas will scale up to handle the load.
Today I will create a Lambda with two different configurations: uploading the code and using a Docker image. And I will connect my Lambda to a URL to run my code by calling a URL.
Creating a Lambda
Let’s go to the Lambda section to create my first Lambda. I will create a Lambda in Python.

In the advanced settings, I will enabled the function URL. But I leave it to NONE. This way I have a public endpoint where to request and trigger the function.

Here is my created Lambda with a default code. But I won’t edit it here. Let’s go to an editor.
The Python Script
I will create a simple script which returns a text message in Json with the content I’ve sent in the HTTP body.
import json

def my_lambda_handler(event, context):
    print(event)
    body = json.loads(event['body'])
    message = f""the message is {body['data']}"
    return {
        'statusCode': 200,
        'body': json.dumps({"message": message})
    }
The method my_lambda_handler is the entry point of the Lambda. I must configure the method name in the Lambda. I will do it in a moment. The important thing here are the event and context parameters.
Let’s print the event to see the structure later. Still, I know that my content is sent in a body field. And inside it’s the structure I want to send.
Last, I return the HTTP code of my Lambda. And as before, any content I want to return must be in the body field.
But what are the event and context arguments? The event contains the body of my post data or the query parameters if available. It also contains some metadata of the trigger. We will see it later in the logs.
And the context contains the information about the Lambda, such as the name, the memory, or the logs stream.
Upload the Script to the Lambda
Let’s now send my Python function to the Lambda. I first need to create a zip file with the content.
zip code.zip my_lambda_function.py
And now, I update the Lambda.
aws lambda update-function-code --function-name my-lambda --zip-file fileb://code.zip
Before requesting my Lambda, I have to say to the Lambda which function to call. I must edit the configuration to indicate my handler.

Done. I can call now my Lambda with a single HTTP request. Let’s copy the URL I must call.
$ curl https://<URL> -H "content-type: application/json" -d '{"data": "hi"}'
> {"message": "the message is hi"}
Here is the data returned by my Lambda. Now, do you remember my print I’ve added to my function? Let’s go to CloudWatch to see the logs from my Lambda.
The Lambda created a CloudWatch stream where I can see all the logs produced by the Lambda. Each entry contains the logs of a single execution of my Lambda.

Here is the structure of the event parameter I’ve printed. I can see here the body I’ve sent with my request.
But what if I need many files in my Lambda? What if my Lambda is too big to fit in a single file? Let’s see. I will move some of the code to a second Python file.
def my_format(body):
    return f"the message {body['data']}"
import json

from my_service import my_format

def my_lambda_handler(event, context):
    print(event)
    body = json.loads(event['body'])
    message = my_format(body)
    return {
        'statusCode': 200,
        'body': json.dumps({"message": message})
    }
Nothing complicated. But I need to include all the files in the zip file.
zip code.zip *.py
And to update the Lambda, I can use the same command as before.
aws lambda update-function-code --function-name my-lambda --zip-file fileb://code.zip
If I have all my Python files in a folder, I can create a zip file with the complete folder. No problem.
Script with External Dependencies
Until now I’ve used a very simple code. What if I need to connect to a database? Or handle some images? What if I need to include an external library? Before I’ve included the Json dependency. But Json is already included in Python. What if I need to include and install numpy?
Let’s now edit my function to use numpy.
import json
import numpy as np

def my_lambda_handler(event, context):

    a = np.array([2, 3, 4])
    message = f"my array is {a}"

    return {
        "statusCode": 200,
        "body": json.dumps({"message": message})
    }
Just create an array and return it in the message. This time I don’t need a body.
I’ve installed numpy in my local project. But the Lambda also needs the numpy dependency too. How do I add numpy to my Lambda? I have two options. The first one is to upload the numpy dependency to the Lambda. Next to my function. And the second option is to create a Docker image where I install the numpy dependency. Let’s start by uploading the numpy dependency.
Okay, but I can’t upload any numpy dependency. I can’t upload the dependency I’ve on my laptop, as I am in Mac OS. At PyPi, I can download a manylinux dependency, which is compatible with the Lambda execution. Let’s download it.

I must ensure that is the 3.9 version. The one I’ve selected for my Lambda.
I have the wheel file next to my Python function. I must now unzip it and create the zip file to upload to my Lambda with some files.
unzip numpy-1.24.2-cp39-cp39-manylinux_2_17_x86_64.manylinux2014_x86_64.whl
zip -r code.zip numpy.libs numpy/ *.py
I only need the numpy folder and numpy.libs. Do not include the dist folder. And now update the Lambda with the same command as before. And I can request it again.
If I take a look at the Lambda in the AWS, I see that I can’t edit my code anymore. As I’ve included a library, AWS doesn’t display it, as it’s too large. Now I can only edit my Lambda from my laptop and upload the code.
This seems easy, but this option has a limit. I can’t upload a zip file over 50 Mb. For those cases, I can only use the Lambda with a Docker image.
Lambda with Docker
Still, I have to create another Lambda. As it has a complete different configuration. I will export all my dependencies in a requirements file.
Let’s create my Dockerfile.
FROM public.ecr.aws/lambda/python:3.9

COPY *.py ${LAMBDA_TASK_ROOT}
COPY requirements.txt ${LAMBDA_TASK_ROOT}
RUN  pip3 install -r requirements.txt --target "${LAMBDA_TASK_ROOT}"

CMD ["my_lambda_function.my_lambda_handler"]
AWS has already some Docker images ready to be used, public.ecr.aws.
I must include all my files in the root directory of the Lambda. LAMBDA_TASK_ROOT is an available environment variable.
I must include the command to install the dependencies from the requirements.txt file.
And run my function with the CMD command and the name of my module and method. This time, I won’t need to edit my handler in the AWS console, it’s all here. I need now to create a repository to push my Docker image and where my Lambda can pull it.

And here are the commands to push my Docker image.

After running those commands, my image will be available in the repository. Let’s continue by creating a new Lambda.
Now, I must select the Docker image option.

But I have no more the URL option.
I can’t request the Lambda from an endpoint. What can I do? I have two options. The first one is to invoke the Lambda using the AWS commands. And the second one is to create a Load Balancer which targets the Lambda. Then request the load balancer. Let’s invoke the Lambda from the AWS command.
aws lambda --profile perso invoke --function-name myLambdaDocker out
Let’s go with the Load Balancer alternative.
Before creating the Load Balancer, I need to create a Target Group which points to my Lambda.

And that’s it. Now I can create my Load Balancer. But it will need a Security Group. The Security Group blocks all the incoming and outgoing traffic from different sources. Let’s create a Security Group which only accepts traffic to the ports 80 and 443.

I accept incoming traffic only at the ports 80 and 443 from everywhere. I leave the outbound rules as it is. I can access everywhere from my Lambda.
And finally, the Load Balancer with the Security Group and Target Group have created. I need to create an Application Load Balancer.

I want my Load Balancer needs to be accessible from the internet.

I need to select almost two public availability zones.
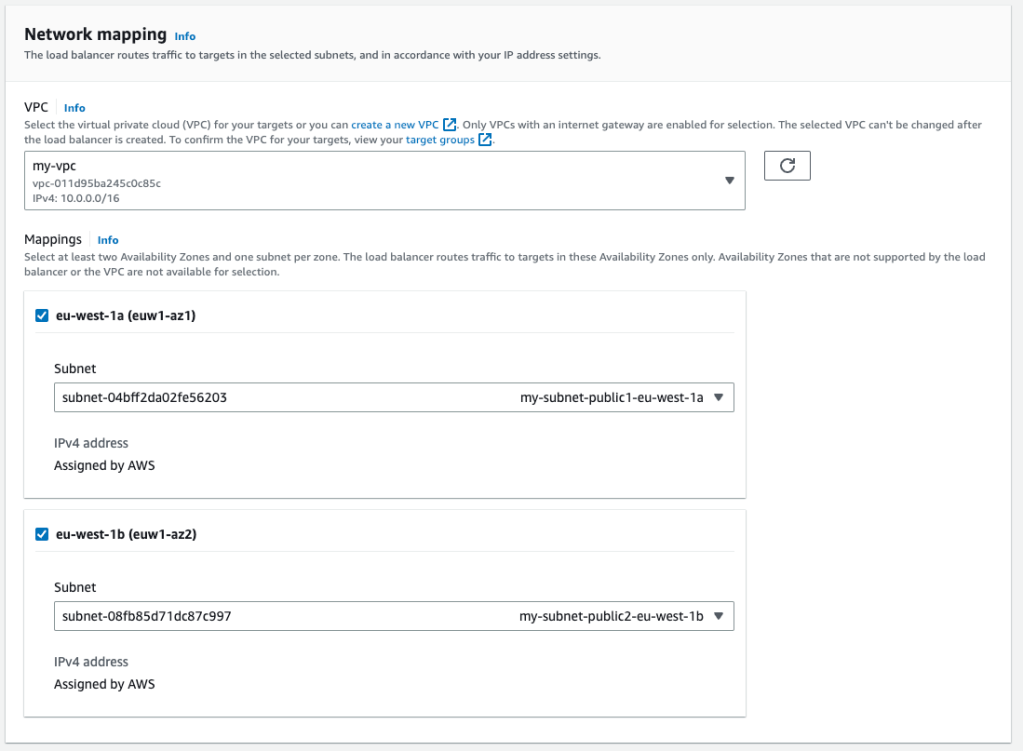
And select the Target Group I’ve just created.

Once my Load Balancer is active, I copy the URL to request it.
$ curl https://<URL>
> {"message": "my array is [2 3 4]"}
Now the result is already parsed by the Load Balancer. The advantage of using the Load Balancer is that I can have a single endpoint, the Load Balancer, and route to different Lambdas. I can configure some complex rules in an API Gateway.
Conclusion
- I’ve created a simple Lambda in AWS enabling the URL so I can request it with a curl.
- I’ve created a simple Python function, zip it and upload it to the Lambda. I have the event input parameter with the body received by the Lambda. I also have the context input parameter with some information about the Lambda.
- If I need to upload many files to the Lambda, I can add all them to the zip file.
- If I need to add some external library to the Lambda I must include the wheel file in the zip file. If the zip file exceeds 15 megabytes, I must create a Lambda which accepts a Docker file.
- To update the Lambda with a Docker image, I need the ECR repository.
- To request a Lambda with a Docker image, I need a load balancer and a Target group.

Leave a comment