In this article I show how to connect a React application to a Spring Cloud Gateway backend using Keycloak as an Authorization Server.
Content
- Backend Authentication
- Frontend Authentication
- Resources Server
- API Gateway
- Keycloak
- Frontend
Check this explanatory video for more details.
All the code is available in the following repository.
Backend Authentication
The OAuth2 protocol has different behaviours depending on the clients used.
But I can’t use the same workflow for a backend authentication than for a frontend authentication.
Let’s see it in detail.

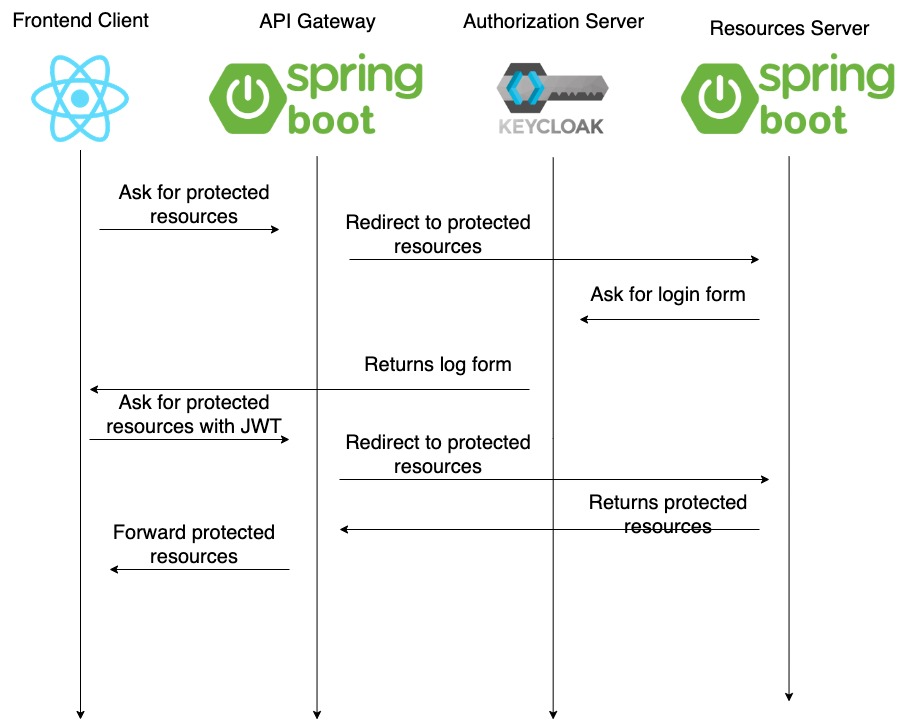
I have a backend server which requires to access protected data.
But this protected data is behind an OAuth2 authorization server.
When the backend tries to access the protected resources, it will receive a login page. I must show this login page to the final user.
Once authenticated, the backend can access the protected resources
Until here, it’s the standard protocol for a backend authentication. I’ve already written an article about that.
But a frontend can’t do the same workflow.
Frontend Authentication
Let’s go back, to the initial step, when the authorization server returns the login to the backend.
The authorization server returns a login form because it already knows the backend, because it already trusts the backend.
How to create this trust?
I first need to register my backend in the authorization server.
Then, the authorization server returns me a client id and client secret I must store in my backend.
I need those two keys to talk to the authorization server.
But what happens if i change my backend to a frontend?
I can’t store the client id and secret in the frontend. as the user will download the frontend in the browser. Anyone could read those keys.
The previous workflow is the Authorization Code Flow.
But when using public clients, like a React application or a mobile application, I need an overlayer. I need the PKCE Authorization Code Flow.
PKCE stands for Proof Key Code Enhanced Authorization Code Flow.
Now, when registering my client in Keycloak, I indicate a hashing algorithm.
When starting the communication, the frontend will create a random string as a code verifier.
The frontend will encode the code verifier and send it to Keycloak when first asking for the login page.
Keycloak will decode it and store the original code verifier.
If the login is successful, the frontend must ask again for an access token. and this time, the frontend must send the original code verifier.
Keycloak will check if it’s ok and responds with the access token.
The frontend can use now the access token to request the protected resources.

Why is this secure now? Because it’s Keycloak that requests the callback.
So, even if I try to send a request by my own, with the client id and an encoded code verifier, I won’t have the callback to my application. And I won’t receive the access token.
Ok, so what must I change on my application now?
The resources server still need to connect to Keycloak. To validate the access token received from requests.
The API Gateway needs no more OAuth2 configuration, all is moved to the frontend.
For the frontend, I can call the specific endpoints of Keyclaok manually, but I would rather use a library for that.
And finally, in Keycloak, I must register my frontend, as a public client with a PKCE.
Let’s see it
Resources Server
I start with the project used in my previous article. Where I connect the API Gateway with Keycloak.
As said, I need the configuration to connect my resources server with Keyclaok.
spring:
  application.name: backend-resources
  security:
    oauth2:
      resourceserver:
        jwt:
          issuer-uri: http://backend-keycloak-auth:8080/auth/realms/my_realm
And in the security configuration, I indicate which scopes are necessary for each endpoint.
@EnableWebSecurity
public class SecurityConfig {

    @Bean
    public SecurityFilterChain securityFilterChain(HttpSecurity http) throws Exception {
        http.mvcMatcher("/**")
                .authorizeRequests()
                .mvcMatchers("/**")
                .access("hasAuthority('SCOPE_message.read')")
                .and()
                .oauth2ResourceServer()
                .jwt();
        return http.build();
    }
}
And the controller stays simple.
@RestController
public class ResourceController {

    @GetMapping("/messages")
    public String getMessages() {
        return "the protected messages";
    }
}
API Gateway
Let’s go now with the API gateway. Here I need to remove all the security configuration. As I will move to the frontend.
Now, as I have a frontend connected to the api gateway, I need to configure the CORS to avoid the usual problems.
spring:
  application.name: backend-gateway-client
  cloud:
    gateway:
      globalcors:
        corsConfigurations:
          '[/**]':
            allowedOrigins: "http://localhost:3000"
            allowedHeaders: "*"
            allowedMethods:
              - GET
              - POST
      routes:
        - id: resources
          uri: http://backend-resources:8082
          predicates:
            Path=/messages/**
That’s all, API gateway clean.
Keycloak
Let’s create now my frontend client.


I leave the capability options disabled.
The Client Authentication off means that the client is a public server. If i enable it, I will get a client id and a client secret. And I don’t want a secret.
The Authorization is for fine tuned authorization, I don’t need this.
I leave the rest of the Authentication Flows with the default values. The only one which interests me is the Standard Flow.

After creating my client, I go to the Access Settings. There, I will add the Callback URL. It’s the URL which will make the second request automatically.
And I must add the Web Origins to allow my frontend access Keycloak.
Let’s go now to the advanced settings.

If I scroll down, I can see the PKCE configuration.
I choose the algorithm to use, and that’s all.
Finally, I create my scope and add it to my client.
Frontend
As said, I can do it all by requesting the Keyclaok endpoints. But it’s a lot of hard coding, and there are some libraries which do it for me.
I will use oidc-client.
yarn add oidc-client
All i need, is to create two helpers, one to talk with Keyclaok and the other to talk with the backend.
Let’s start with the authentication helper, to talk with Keyclaok.
import { UserManager } from 'oidc-client';

const settings = {
  authority: "http://backend-keycloak-auth:8080/auth/realms/my_realm/",
  client_id: "my_client",
  redirect_uri: "http://localhost:3000/signin-callback.html",
  response_type: 'code',
  scope: "openid profile message.read",
};

const userManager = new UserManager(settings);

export const getUser = () => {
    return userManager.getUser();
}

export const login = () => {
    return userManager.signinRedirect();
}

export const logout = () => {
    return userManager.signoutRedirect();
}
This first method, getUser, is to read the user object stored in the localstorage. This method doesn’t read it from Keycloak. I must first login to use this method.
The second method, login, will perform the login. It will redirect the end user to the login page of Keycloak.
Finally, I’ve also written the logout method.
Let’s see what I do in the callback page.
...
    <script src="oidc-client.min.js"></script>
    <script>
        new Oidc.UserManager({ response_mode: "query" }).signinRedirectCallback().then(function () {
            window.location = "index.html";
        }).catch(function (e) {
            console.error(e);
        });
    </script>
...
Here, I only call the signinRedirectCallback, which will receive the user object and store it in the localstorage. This way, it’s accessible for further requests.
Let’s continue with the helper to talk with the backend, which is using axios but with the access token.
import axios from 'axios';
import { getUser } from './auth_helper';


const _callApi = (token) => {
    const headers = {
        Accept: "application/json",
        Authorization: "Bearer " + token
    };

    return axios.get("http://backend-gateway-client:8083/messages", { headers });
}

export const callApi = () => {
    return getUser().then(user => {
        if (user && user.access_token) {
            return _callApi(user.access_token).catch(error => {
                throw error;
            });
        } else {
            throw new Error('user is not logged in');
        }
    });
}
When calling the backend at line 11, I need the access token. This access token is the JWT to use in the HTTP header of the requests.
Conclusion
- Remove the configuration from the API Gateway;
- Connect my resource server to Keycloak;
- Create a public client with PKCE in Keycloak;
- Add the library oidc-client to my frontend;
- Configure my oidc object with the client id, the Keycloak url, the callback url and the scopes;
- After login the first time, use the received access token for all the requests to the backend.

Leave a comment