

In this article I show how to deploy a microservices architecture to AWS ECS. In 4 easy steps, which can be done from a CI/CD platform.
Content
- Microservice Architecture
- Step 1: Load Balancer & Target Group
- Step 2: ECS Cluster
- Step 3: ECS Task Definition
- Step 4: Run ECS Task
- Step 4-bis: Run ECS Task from a CI/CD Platform
For more details, watch this video.
Microservices Architecture
I’ve already shown in another article about deploying a simple application to AWS EC2. But when deploying a microservice architecture, I need something more advanced. What must I take into account when deploying a microservices architecture?
- High availability
- Servers amount differs from microservices amount
- And deploy strategies
The high availability allows me to run many instances of a service to distribute the load. This is also called the horizontal scaling. When more requests reach some of my microservices, I can create a new instance to distribute the load.
I must also take into account that some new instances may be created dynamically, this means it must adapt the number of servers depending on the created instances. It may need more or less CPU reservation. It may need to start a new server. Or the new instance can use the remaining CPU. My architecture must be smart enough to start a new server if the resources are insufficient. Or shut down a server if there are too many unused resources.
One last point, how to deploy a new version of a single microservice? Will all the instances be shut down at the same time? Or one by one? When deploying with ECS, I can choose the deploy strategy. I have the Rolling Update, the Blue-Green and the External Deploy.
The Rolling Update will update instance by instance until the last one. I can specify the percentage of instances I want to keep up during the process and how many new instances I allowed to create.
The Blue-Green strategy is only available by using CodeDeploy. It will deploy instances with the new version and redirect some traffic to the new instances and some traffic to the all instances. This way I can go back if needed.
Finally, the External Deploy is a fine tuning tool. It allows me to manually manipulate all the services tasks and load balancers. I have not seen a case where this can be interesting.
Let’s go now with 4 easy steps to deploy my microservices architecture to AWS ECS.
Step 1: Load Balancer & Target Group
I will start by creating the Load Balancer to access my microservices. For that I need two services: the Load Balancer of course, and the Target Group.
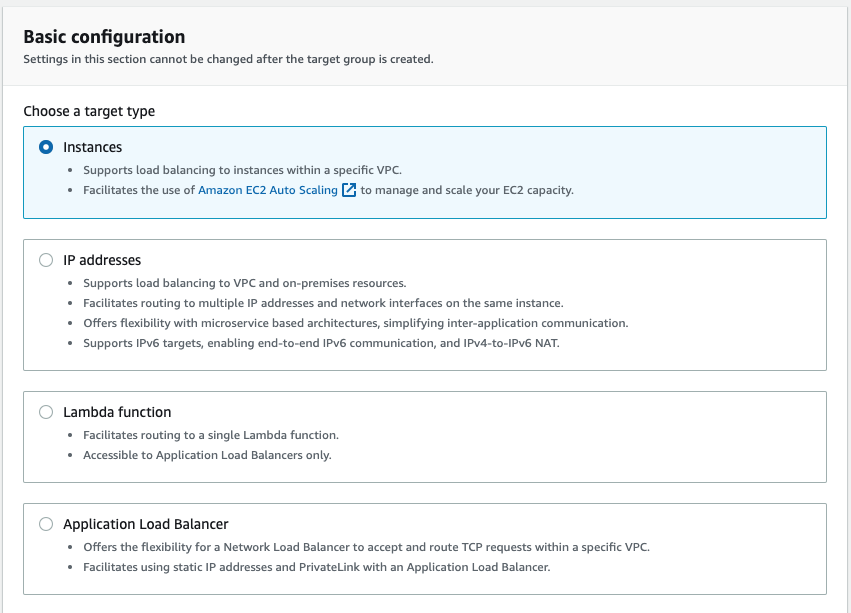
Let’s start with the Target Group. The Target Group will have registered each microservice and it will check if it’s healthy or not to redirect the traffic to it. Then, the Load Balancer will receive external traffic and redirect it to the available instances in the Target Group.
I must choose the Target Group to work with instances.
And configure a healthcheck which is available in the application I want to deploy.

The next step, when asking for Register Targets, can be skip. Because I have no instance running yet.
Let’s continue now with the Load Balancer. I choose to create an Application Load Balancer.

In the Load Balancer, I can configure the Internet Facing, which allows traffic from internet.
When configuring the listeners, I must select the same ports used in the Target Group, then, the Target Group created before will be available as the Forward To rule.

Step 2: ECS Cluster
Let’s continue creating the ECS cluster, the EC2 instances where all my micro services will run.
The important points here, are the selection of no SSH key, as I don’t need to log into those instances, and to enable to Auto Assigned IP to make the instances accessible from the internet.
After creating the ECS Cluster, I must wait until my EC2 instances are running.
Step 3: ECS Tasks
Before creating my ECS Tasks, before defining how to deploy a microservice instance, I will create a Docker repository, an ECR, where to push a Docker image of my microservice.
To create a repository, make sure it’s private. Nothing more.
Let’s go now to the ECS Task Definition.
When creating a Task Definition, I will be ask for an IAM Role. I must leave this empty as I don’t need my microservices to access any AWS API.
The important thing happens when adding a container. The container is the microservices definition. It’s where I describe the Docker image to pull, the CPU and memory necessary for my microservice and the port mapping.

Step 4: Run ECS Tasks
I will first show how to deploy a service from the AWS console and later I will do it again from a terminal, as done from a CI/CD platform. So let’s now deploy my microservice to ECS from the task definition.
The ECS Task Definition contains only a template of my microservice, of how to deploy a microservice. Inside the ECS Task Definition I will find the ECS Task Revision. An ECS Task Revision is a concrete version of my microservice, linked to a concrete Docker image and an specific resources needs. Everytime I want to update my microservice, I need to create a new ECS Task Revision.
To start a new ECS Task, I go to the ECS cluster and create a service based on the latest ECS Task Revision.
I can indicate how many instances I want to start of my microservice. Let’s say two, this way, if one instance has a problem, there will be another one to handle the requests.
I can also choose the deployment strategy. I choose 100% healthy and can reach 200% maximum. This means that I want all (100%) the indicated instances to be up running while I update a new version, and start as many instances (200%) as the old one with the new version. When an instance with the new version is up, stable and running, it will shut down an instance with the old version. And so on until the last one.
When starting a service, I can choose the policies to how to scale my microservice. I want the CPU to be around 50%. This way, AWS will create or destroy the necessary instances to maintain the average CPU of all the instances to 50%. I can force to create until 10 instances and never less than two.
After creating the service, I can check the service status in the Event tab.
When my service is deployed and stable, I can test it. I must go back to the Load Balancer to pick the URL to request. The Load Balancer is the one which has the public URL to request my microservices.
Step 4-bis: Run ECS Task from a CI/CD Platform
I must first push a new Docker image with a new version. Then create a new task revision based on the task definition. And finally update the existing service with the new revision. Let’s see the commands.
Let’s start by creating a new ECS Task Revision.
aws ecs register-task-definition
--familiy my-microservice-task
--execution-role-arn <execution role>
--container-definitions ”[{\”name\”: \”my-microservice-repository\”, \”image\”: \”<>\”, \”cpu\”: \”256\”, \”memory\”: \”256\”, \”essential\”: true, \”portMappings\”: [{\”containerPort\”: 8080, \”hostPort\”: 0, \”protocol\”: \”tcp\”}]}]”
With –family, I identify the task definition. –execution-role-arn is the ID of the created execution role by AWS. And –container-definitions are the settings of my container, with the link to my latest Docker image.
Let’s go now using the previous ECS Task Revision to update the existing Service.
aws ecs update-service
    --cluster my-cluster
    --service my-microservice
    --desired-count 2
    --task-definition my-microservice-task:2
    --deployment-configuration “{\”maximumPercent\”: 200, \”minimumHealthyPercent\”: 100}”
    --force-new-deployment
With —cluster, I indicate the name of my cluster. –service indicates the name I want for my service. –desired-count is how many instances I want of my service. –task-definition is the task definition with the latest revision. And the –deployment-configuration is the deployment configuration with the maximum percentage and the minimum healthy percentage. Finally, –force-new-deployement is to indicate that I want my deployment to be effective as soon as possible.
Conclusion
- I’ve created an ECS cluster with two instances which will contain the services deployed.
- I’ve created a Load Balancer to have a single entry point and redirect all the requests to all my existing services.
- I’ve created an ECS Task Definition for my microservice and a Revision with the latest version from a Docker image.
- I’ve deployed my microservices in the cluster specifying the rollout strategy.
- I’ve created the auto scaling rules for my service.
- And finally I’ve identified the commands to use from a CI/CD pipeline to update my existing microservice with a new version.
References
- https://aws.amazon.com/ecs/
- https://aws.amazon.com/ec2/
- https://aws.amazon.com/codedeploy/
- https://docs.aws.amazon.com/elasticloadbalancing/latest/application/create-target-group.html
- https://docs.aws.amazon.com/AmazonECS/latest/developerguide/task_definitions.html
- https://docs.aws.amazon.com/AmazonECS/latest/developerguide/update-task-definition.html


Leave a comment