Today I will show how to deploy a simple Spring Boot application to AWS EC2. I will do it in such a way to be used from a CI CD pipeline. In such a way each new version will be deployed automatically to EC2.
Content
- The Cloud
- AWS EC2
- Hands-On
- AWS Account
- VPC
- SSH Key
- Security Group
- EC2
- Connection
- From CI/CD
- AMI
- S3
- User Data
- Start an EC2 Instance
You can find more details in the following video.
The Cloud
For more than 10 years already, I don’t need to buy an expensive server to deploy an application. I have plenty of cloud providers which offer me virtual machines to rent. I have GCP, Google Cloud Platform, Azure from Microsoft, and AWS, Amazon Web Services.
For the current article I will focus on AWS.
AWS has plenty of services to deploy an application: EC2, ECS, Lambda, EKS and more. But let’s focus on the easiest one for now, EC2.
EC2 is a virtual machine. AWS rents me a virtual machine per hour. If I use it all the month I must pay 720 hours of usage. If I turn off my VM on nights and on weekends, I pay less. I only pay for it when I use it.
AWS EC2
But what is an EC2 instance? EC2 stands for Elastic Cloud Computing. It means that I rent some cloud computing resources in an elastic way. If I want one CPU, I configure my instance to have one CPU. If I want 10 CPUs, I upgrade my existing instance to the target.
But a VM is not only CPU, I can also configure the RAM memory and the hard drive and more customizations.
When turning on a VM, an EC2 instance, there are some considerations to take into account. The first one is the VPC, the Virtual Private Cloud. This is the network where will be placed my EC2 instance. All the instance I turn on in my account will be associated to my VPC. I can have bigger networks smaller networks or multiple networks depending on the architecture of my application.

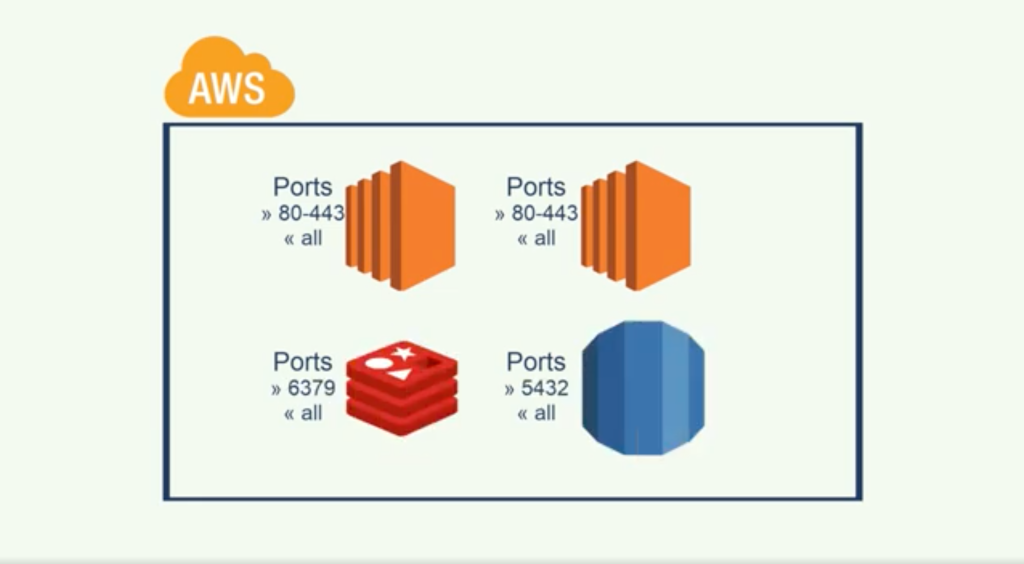
Another service before starting with the demo, the Security Groups. I have now my EC2 instances, my VMs, inside a VPC, inside a network. But which ports are available? Which are open? Are they open to the world? Or only to a given IP address?
The Security Groups will filter the requests to the EC2 instances per port. I can block all the incoming requests to my instances but for one single port. And in the reverse way give complete access from my instances to the internet. The Security Groups can be applied to other services as the databases or cache services.
Hands-On
I have a simple application, a Spring Boot application. Which responds to the following endpoint.
> curl localhost:8080/test
hi
I will now create an instance in AWS to upload my application and request it.
AWS Account
I first created a fresh AWS account. Some personal information were necessary as my contact information and a credit card. Nevertheless, I can use AWS for free so no charges will be applied. But only some services and resources are available for the free tier.
I must first choose my region, eu-west-1, where all my resources will be created.
VPC
I will start by creating a VPC, a network where to deploy my EC2 instance.
When creating a VPC, I can create a bare VPC or a complete set of connected resources, as subnets, routes and more.
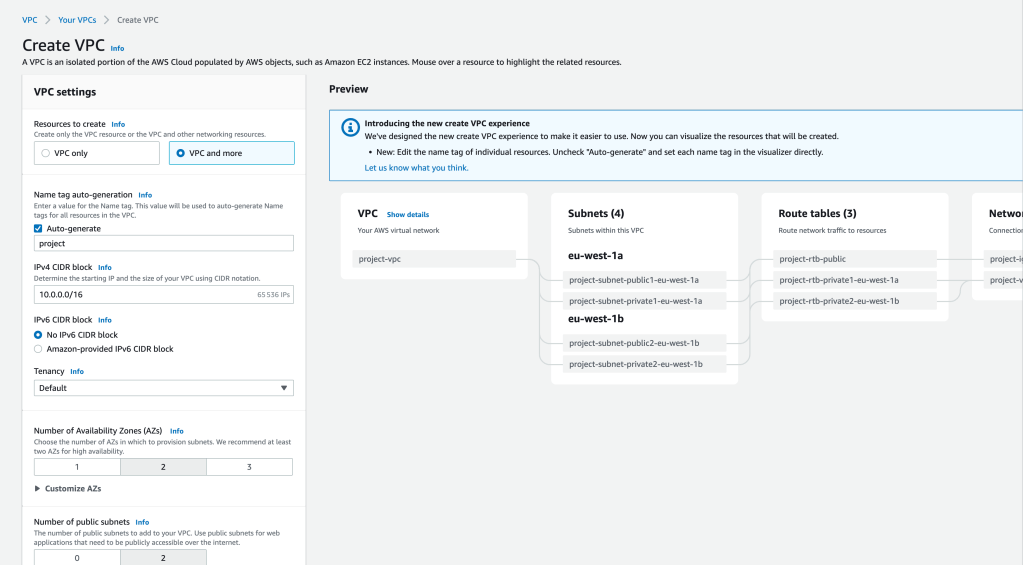
I won’t explain all of those because it’s out of the scope of this article.
So I create a VPC with all the attached services, which are mandatory to create later my EC2 instance. I leave all the options by default and create it.
SSH Key
Before creating my EC2, I will upload my SSH key to AWS. This will let me connect to my EC2 instance later with SSH.

Security Group
To access my instance, I need the port 22 for an SSH connection and the port 8080 as it’s the default port of my Spring Boot application. The rest of the ports must be closed.
On the other way, I have no restrictions for the outgoing connections. I let my instance to connect to any external port, all in the internet.

EC2
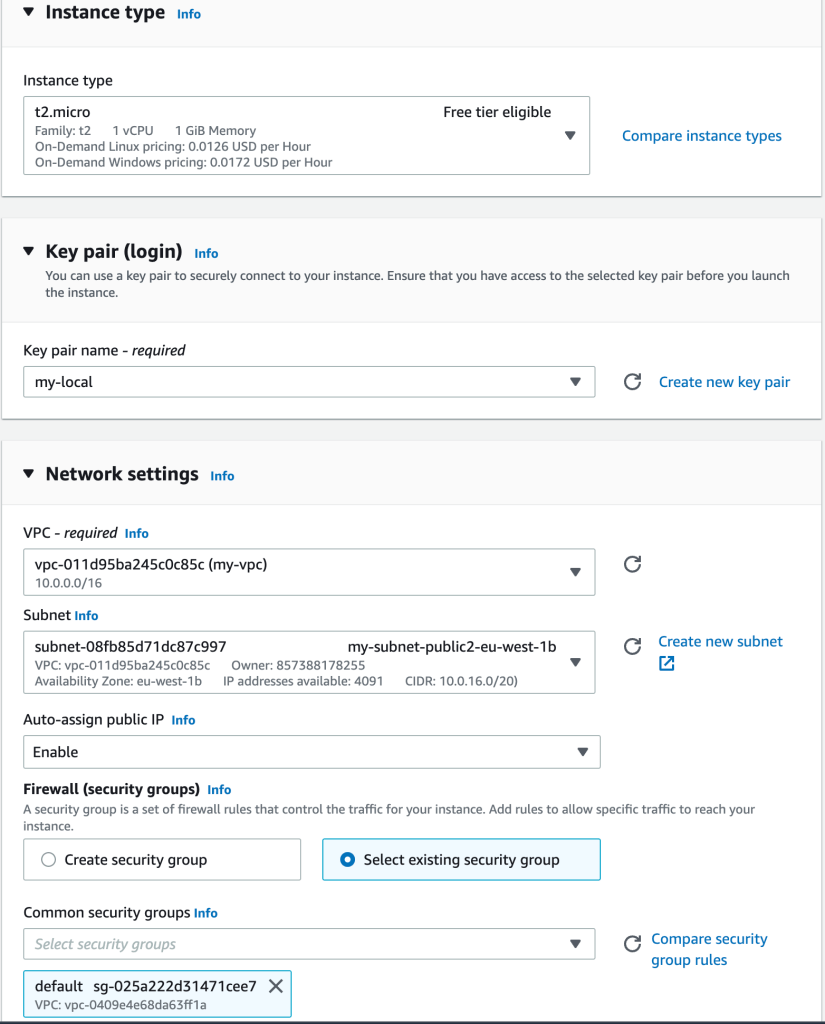
I start by naming my instance. Then choose the OS. I don’t want anything particular, just a Linux one. So I choose the default one, the Amazon Linux, which is based on CentOS.

Then choose the size of the instance. This will impact on the cost of my instance. I want to stay on the free tier, so I choose the t2.micro. I have more choices, with their specificities and cost.
I choose my previously uploaded SSH key. This way I can connect my instance via SSH.
In the networking settings, I will change to use my VPC. Be sure to use a public subnet, otherwise the instance won’t be accessible from the outside. I must enable the auto assigned IP. This way the instance will have a public IP, where I can connect from my localhost.
And finally choose the previously created Security Group.
I leave the storage, the hard drive, as it is.
And finally just take a look at the advanced details. If I go to the bottom, I see the User Data where I can put a shell script which will be executed when starting my instance. I won’t use it now. But remember it for later. It will be very interesting to be used from a CI/CD.
Finally, hit the launch button and wait until it’s available.
Connection
I just need the public IP now, and go to a terminal. The default user on an EC2 instance is ec2-user.
ssh ec2-user@<the-public-ip>
I need now to deploy my application here, my Spring Boot application. For that I first need to install Java, as it’s not installed by default in a Linux distribution.
[ec2-user@<the-public-ip>] > sudo yum update
[ec2-user@<the-public-ip>] > sudo yum install java-17-amazon-corretto-headless.x86_64
Okay my instance is ready to run my application. Let’s upload my application and test it. I will come to my localhost and copy the JAR file to my EC2 instance.
> scp target/demo-0.0.1-SNAPSHOT.jar ec2-user@<the-public-ip>:/home/ec2-user/
Go back to the instance and run it.
[ec2-user@<the-public-ip>] > java -jar demo-0.0.1-SNAPSHOT.jar
Finally I will test it from my localhost.
> curl <the-public-ip>:8080/test
hi
My application is deployed on an EC2 instance.
From a CI/CD
Let’s see now how to deploy automatically the application in the EC2 instance from a CI/CD pipeline.
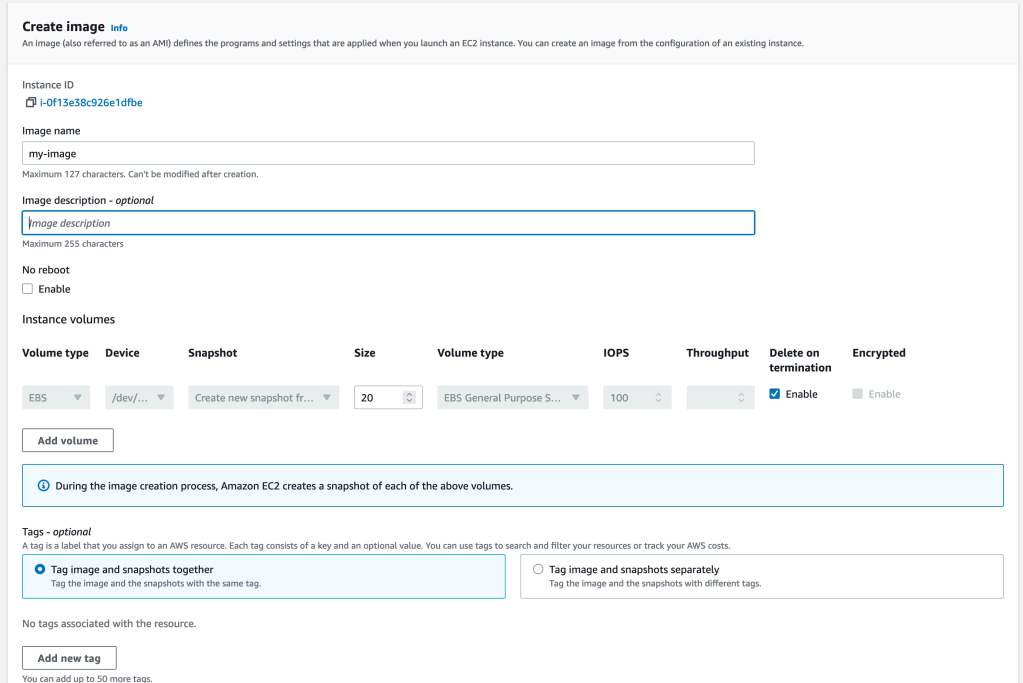
AMI
The first thing I will do is create an image, an AMI, from the EC2 instance. This will create a copy of the hard drive content as a backup. And every time I want to start a new EC2 instance, I can start it from this image. This way I already have Java installed. Then I just need to upload a fresh version of my application. Let’s create the image.
Now I can run another instance from this image from the console. But that’s not my purpose. My purpose is that when a new version of the application is ready, is tested and packaged, I want to be automatically deployed in a new EC2 instance. For that, I will use the already seen User Data.
The User Data is a shell script that can be run at the startup of my EC2 instance. I will add a script which will download the new version of the application and start it.
S3
But from where can I download the new version? I will use another service of AWS, S3. S3 is a Simple Storage Service. It’s just a place where I can upload any file I want.
So at the end of my pipeline, when my package is created, I will upload it to S3. Then start the EC2 instance. And in the startup script of the EC2 instance, I first download the new version from S3 and then start it.
Let’s start by creating an S3 bucket.
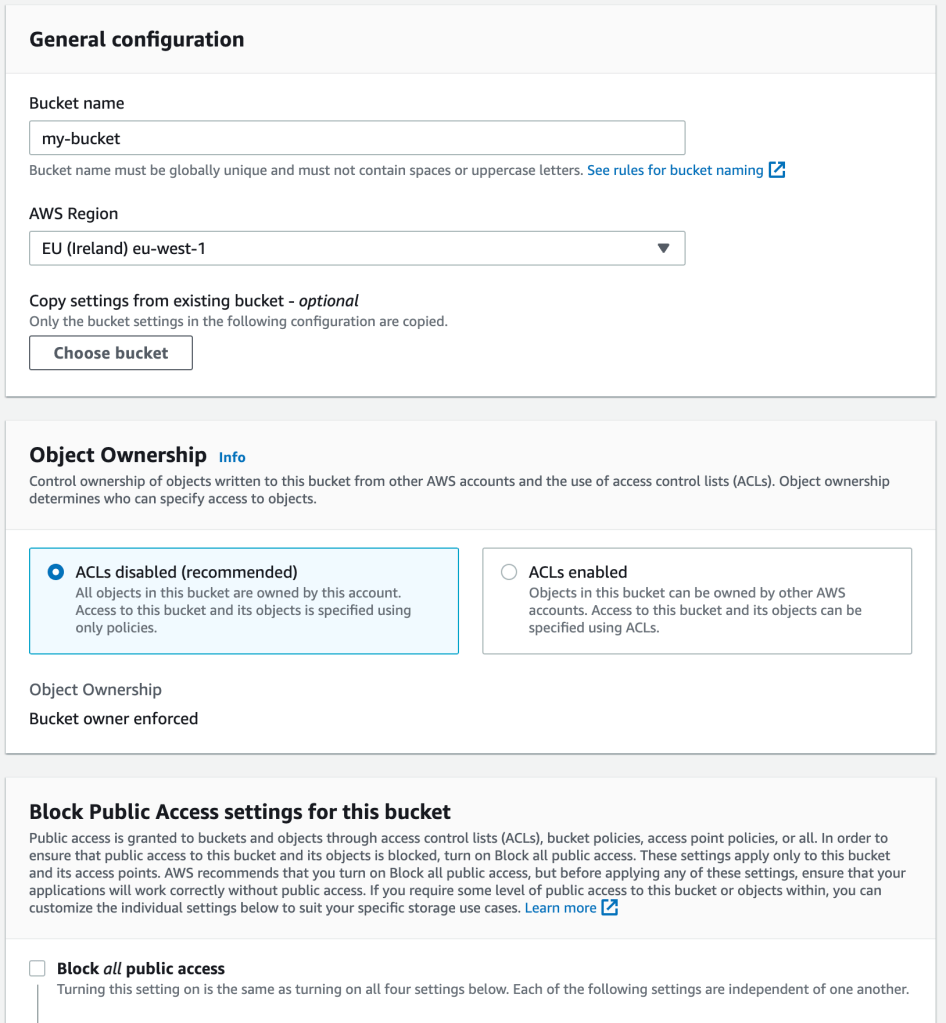
I will leave it public for simplicity. But of course, this is a very bad practice. I should protect it, then modify the authorizations on my EC2 instance to be able to access the bucket. But that’s out of the scope of this article.
User Data
And now, let’s go to the terminal to create the startup script.
#!/bin/bash
cd /home/ec2-user/
aws s3 cp s3://my-bucket/demo-0.0.1-SNAPSHOT.jar .
java -jar demo-0.0.1-SNAPSHOT.jar
This script is saved inside my project. This way it’s available in the CI CD pipeline.
Start an EC2 instance
And finally what are the commands to run from my CI CD pipeline?
> mvn clean package
...
> aws s3 target/demo-0.0.1-SNAPSHOT.jar s3://my-bucket/
...
> aws ec2 run-instances --image-id ami-abcd1234 --count 1 --instance-type t2.micro --key-name my-key-pair --subnet-id subnet-abcd1234 --security-group-ids sg-abcd1234 --user-data file://startup.sh --associate-public-ip-address
I first compiled the project to obtain a new package.
Then upload the package to S3.
For this command to be successfully executed with my AWS account, and must ensure that the AWS command is correctly configured with my AWS account, or I can have those environment variables set in the CI CD runner.
And finally start another instance with the new version.
The parameters used in aws ec2 run-instances are:
- The ID of the image template I’ve created;
- How many instances I want to run at launch;
- The resources configurations of the EC2 instance I want;
- The SSH key;
- The information about the VPC and subnet;
- Where the EC2 instance will be created;
- The Security Group I’ve have created to block the ports;
- My startup script;
- And indicate that I want a public IP to be assigned to my EC2 instance.
After running this command, the EC2 instance will be started. I must wait one minute or two until it’s available. Then I have my application accessible with a new IP.
I know that having a new IP for each version is not the best. I may use an Elastic IP, configure a Load Balancer or some rules on Route53. There are multiple solutions, but I want to keep this article simple.
Conclusion
- I’ve created a VPC, a full network with all its sub networks and routes.
- I’ve uploaded my SSH key to be able to access my EC2 instance via SSH.
- I’ve created a Security Group to block the ports I don’t need.
- I’ve created my first EC2 instance.
- I’ve installed all the dependencies I needed and then created an image to be used later.
- I’ve finally created an S3 bucket where to upload all the new versions of my application.
- I’ve created a startup script which downloads the latest version from S3 and start the application.
- Finally, from the CI CD runner, I’ve packaged my application, uploaded it to S3 and started a new EC2 instance.

Leave a comment