

In this article I will create my first Github Actions. I will use the CI/CD pipeline of Github to run several commands over my project. I will also show how to configure a self hosted runner.
Content
- CI/CD
- Github Actions Concepts
- Github Runners
- Hands-On
- Run all the tests Step
- Deploy Step
- Self-Hosted Runner
- Results on Github
Check this video for more details.
You can find all the code of the article in the following repository.
If you’re more interested on building a CI/CD pipeline in Gitlab, check this article.
CI/CD
A team project is only feasible if each new commit is tested. For that, I must put in place a CI/CD workflow. Today, I will show how to set up the Github Actions to test my application after each commit with different workflows and dependencies between the jobs.
A CI/CD platform is a Continuous Integration and Continuous Deployment platform. This means that my code is continuously integrated with the rest of the project, tested, validated and even deployed to some target environment. For that, I will use the Github Actions. Every time Github receives a new commit in my project, a new pipeline will be triggered to test my project. But what are the concepts used in the Github Actions?
GitHub Actions Concepts
I mainly have: the workflows, the jobs and the steps. A step is the minimal action I can perform. Is a single command, a single Github action, just one line. It accepts parameters and can return something. A job is a list of steps. If a single step fails, the job stops. I can also define some variables to be used all along the job. The jobs can run sequentially if there is a dependency between them or in parallel if there is no dependency. Finally, a workflow is a list of jobs.
All of these will be configured in a YAML file inside the project. This means that the workflow is defined directly inside my project. If my project structure changes in some branches, I can adapt the workflow only to those branches.
GitHub Runners
Okay, but all of this must be run somewhere. The commands must be executed in some machine. Here come the runners. The runners are virtual machines that will accept the workflows and execute all the jobs and steps. With Github, I have two options for the runners: I have the Github hosted runners and the self-hosted runners. To use the Github hosted runners, I need to subscribe to some paid plan. This allows me to run my workflows on a ready-to-use runner hosted in Github. The alternative is to use a self-hosted runner. A runner that will be hosted in my local or in some other machine I own.
Hands-On
Okay, but what I am going to build today? I will create two workflows: one to deploy my application somewhere and another workflow to deeply test my application. I want my deploy workflow to be run only in the master branch. And the test workflow to run in the rest of the branches. Nevertheless, I can’t deploy my application without almost running the unit test. So, the deploy workflow must also have a simple test job to be run before the deploy job. Let’s go.
Run all the tests Step
The YAML files with the definition of the workflows are located in a folder inside the project which you must be named .github/workflows. Now I will start creating the workflow which will run the full list of tests in a file named only-tests.yml.
name: only-tests

jobs:
  run-all-tests:
    runs-on: self-hosted
    steps:
      - name: Checkout
        uses: actions/checkout@v3

      - name: Setup Java
        uses: actions/setup-java@v3
        with:
          java-version: 11
          distribution: 'adopt'

      - name: Set up Maven
        uses: stCarolas/setup-maven@v4.4
        with:
          maven-version: 3.8.2

      - name: All the Tests and Coverage check
        run: mvn clean install
only-tests will be the name displayed in Github when I will see the status of the workflow which runs. I’ve only added a single job named run-all-tests. But this job has four steps.
The first one, Checkout, is a Github action which will download the complete project inside the runner. You can check the list of all the available actions here.
The second step, Setup Java, will prepare the runner to use Java with the given version and distribution. This will download the adequate package install it and prepare the environment variables.
The next step, Setup Maven, will set up Maven. As it’s not by default in the Java action. I get this action from the Github Actions Marketplace. You can find hundreds of actions for anything.
Finally comes my command, All the Tests and Coverage check, my Maven command which will run all the unit tests, integration tests and coverage checks. This line will be run directly in the runner, at the project level. This step uses the “run” keyword which means that the following is a command to be run directly. The previous steps used the “uses” keyword which means to use an already existing Github action.
Those steps will run sequentially, one after the other, if one step fails, the rest won’t be run. And what about the line runs-on: self-hosted? This defines which runner to use. I don’t have a paid plan in Github, so, I will use a self-hosted runner. I will show later how to configure it.
Okay, the workflow to run all the tests is ready. But I want this workflow to run on all branches but main.
on:
  push:
    branches-ignore:
      - main
This way, I indicate that the workflow will run on any push, ignoring the following branches. Instead of push, I can indicate to run only on merge requests, on tags, on created issues or more.
Deploy Step
Ok, the first workflow to run all the unit tests, integration tests, and coverage checks is ready. Let’s go now with the deploy workflow. In the deploy workflow, I must also include a step to run all the unit tests, just in case of. If this job runs correctly, I will run a second job which will deploy my application. The job for the deploy will be a fake deploy, as I have nowhere to deploy my application right now. But I will show how to pass an artifact from one job to another.
name: deploy
on:
  push:
    branches:
      - main

jobs:
  run-unit-tests:
    runs-on: self-hosted
    steps:
      - name: Checkout
        uses: actions/checkout@v3

      - name: Setup Java
        uses: actions/setup-java@v3
        with:
          java-version: '11'
          distribution: 'adopt'

      - name: Setup Maven
        uses: stCarolas/setup-maven@v4.4
        with:
          maven-version: 3.8.2

      - name: Unit Tests
        run: mvn clean package

      - name: Rename the artifact
        run: cp target/backend-social-network-1.0-SNAPSHOT.jar backend-social-network-${{ github.sha }}.jar

      - name: Save the artifact
        uses: actions/upload-artifact@master
        with:
          name: backend-social-network
          path: backend-social-network-${{ github.sha }}.jar

  fake-deploy:
    runs-on: self-hosted
    needs: run-unit-tests
    steps:
      - name: Get the artifact
        uses: actions/download-artifact@master
        with:
          name: backend-social-network

      - name: Fake deploy
        run: ls backend-social-network-*.jar
First of all, this workflow will only be applied on main branch. As before, I used the actions Checkout, Setup Java and Setup Maven.
Then, my step where I run only the unit tests, Unit Tests. The “package” goal in Maven will also generates me the JAR file inside the “target” folder. I will first get this JAR file and rename it with the commit hash. This allows me to keep all the JAR files after some time and don’t overwrite them at each deploy. ${{ github.sha }} is a Github variable available during the workflow. This is the syntax to use to access any environment variable available in the workflow. I can add my custom environment variables or use the Github one, as branch name, the project name and more.
Finally comes another Github action, Save the artifact. This one will backup my artifact, my JAR file, in the runner. This allows me to share some files between the steps or jobs.
Then comes the second job, fake-deploy. I’ve indicated that this job needs the previous one to be run previously and successfully with the keyword needs. If the first job, during unit test, has a single step which fails, the job fake-deploy won’t even start. This second job has only two steps. The first one, Get the artifact, will only download the previously uploaded artifact with another Github action. And finally, Fake deploy, the deploy action.
As said, I have nowhere to deploy, so, I only show the artifact which is the same which was uploaded previously. The workflow files are ready now. I must commit those files to my project. Then, Github will parse the files and assign the workflow to an available runner. So, I need to configure my self-hosted runner.
Self-Hosted Runner
When going on the settings section of my Github project, I have the actions and runner tabs. Here, I can create some new runners.


I must use the runner which corresponds to my OS. Then, in the following blocks are the download instructions, the configurations, and the run commands. Within the configuration block is the token which will link my runner with my Github account. If not used, this token is only valid during one hour. So, let’s create the runner.
As I’m a big fan of Docker, so, instead of running the runner directly on my computer, I will use a Dockerfile with the same instructions.
FROM debian:latest

ARG TOKEN=not-set

RUN apt-get update && apt-get install -y curl libgtk-dotnet3.0-cil

ENV RUNNER_ALLOW_RUNASROOT=1

RUN curl -o actions-runner-linux-x64-2.294.0.tar.gz -L https://github.com/actions/runner/releases/download/v2.294.0/actions-runner-linux-x64-2.294.0.tar.gz && \
	tar xzf ./actions-runner-linux-x64-2.294.0.tar.gz
RUN ./config.sh --url https://github.com/serlesen/backend-social-network --token $TOKEN --name linux --work _work --runasservice --disableupdate

CMD ["./run.sh"]
I will use a Debian image and set the token as an argument. This way, each time I build my image, I can use a different token. Then, install the necessary dependencies for the commands indicated in Github. At line 9, I download the runner. At line 10, I run the configuration indicating the platform I’m on and that I am in a non-interactive shell. I’ve also added to disable the updates as I saw some troubles with that. Finally, run the runner with the CMD command. When starting the Docker image, my runner will be ready to accept any incoming job.
Results on Github
When pushing my code to Github, the runner will execute the workflows on my self-hosted runner, but the result will be available on Github.
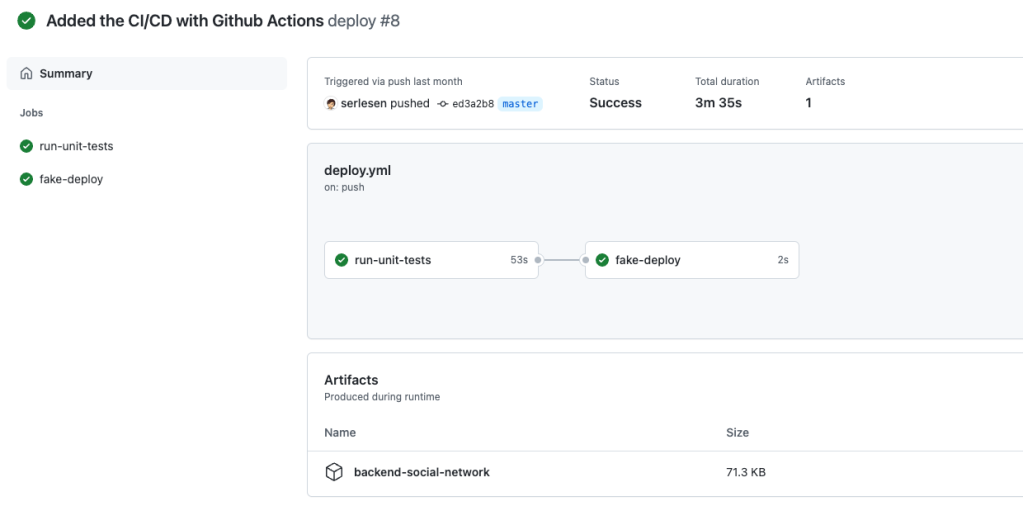
I can see both jobs. And the dependency between them. If I go inside, I see all the steps I’ve created, and some default one. I can also see the logs of each step.

Conclusion
- I’ve created two workflows in separated files.
- The first workflow will be dedicated to run all the tests: the unit test, the integration test, and the coverage checks. This workflow will be executed on all the branches but master.
- The first workflow contains a single job with multiple steps: checkout of the project, set up Java, set up Maven and runs the Maven command.
- The second workflow will be dedicated to deploying my application. This workflow will only be executed on the master branch.
- The second workflow is composed of two jobs: the first one checks only the unit tests, and the second one is the deploy. But the deploy will only be executed if the unit tests are successful.
- The steps of the first job are: the checkout of the project, the setup of Java, the setup of Maven, the unit tests and packaging, and finally uploading the JAR file as an artifact.
- In the second job, I have a step to download the uploaded artifact. And then a fake deploy.
- And I’ve configured the workflows to run on a self-hosted runner. This one will run on a Docker image I’ve created on my localhost. And it’s connected to my Github account.


Leave a comment