
In this article, I will compare the OAuth2 and OpenID Connect authentication protocols. I will implement the OpenID Connect with the Spring Security Authorization Server.
Content
- OAuth2 Servers
- OpenID Connect
- Hands-On
- Workflow
For more details, check this video.
All the code used in this article is available in this repository.
From recent versions of a Spring Security, I have the Authorization Server. This authorization server allows me to implement the OAuth2 and OpenID Connect.
OAuth2 Servers
Authorization Server
There are multiple servers when using the OAuth2 protocol. The first one is the Authorization server. This one is the one, the only one, which stores the credentials. It’s the one dedicated to validating the username and password of the end user. I will call it backend-auth.
Resource Server
Then comes the resources server. This is the one which contains the protected data. But this protected data won’t be requested directly by the end user. Another third server will request it. Let’s call this one backend-resources.
Client Server
And finally, the client server. This is the server which will request the protected data. This is also the server used by the end user.
Let’s say I am a regular user of a site “I brag about my vacations“. And I want to upload some of my pictures to the site. The pictures are stored in my personal account, along with my emails. So the client, which is the site “I brag about my vacations“, will try to access the resources, which are the pictures located on a separate server. To access those pictures, the client will need my authorization to do so. The client will delegate the authentication to the Authorization Server. Now I’m talking directly with the authorization server. It will ask me for my credentials and ask if I consent the client “I brag about my vacations” to access the protected pictures. This way, the site “I brag about my vacations” doesn’t need to store my credentials. It delegates all of this to the Authorization Server.
Nevertheless, the communication between the client and the Authorization Server is only possible if the client is already known by the Authorization Server. The client must previously obtain a client-id and client-secret from the Authorization Server. Otherwise, the Authorization Server won’t trust it.
Now, the client “I brag about my vacations” has the consent to access the protected pictures. Nevertheless, consent is only given for a specific scope. So, the client can access the resources within this given scope.
Let’s reformulate the workflow. I consent to the client to access protected resources on my behalf. And the client doesn’t need my credentials. For that, only the Authorization Server handles my credentials.
OpenID Connect
It was cool but what about the OpenID Connect? The previous workflow was only about the OAuth2 protocol. But the OpenID Connect, or the OIDC, is just another layer on top of the OAuth2 protocol. Let’s see what changes.
The components are exactly the same. I still have the client, the resources, and the Authorization Server. When the client asks for the authorization, I won’t ask for a specific scope but for the OpenID connect scope.
With the OAuth2 protocol, the client asks for the scopes like “read pictures“, “edit pictures“, “read profile” or “read contacts“. With the OpenID Connect, the client asks for the “openid” scope. This won’t return a simple code as before for a single usage. Instead, the Authorization Server will respond with a rich full JWT, with a lot of claims. Those claims are endpoints and encryption information to facilitate new requests from the client. If the client needs another code to access the pictures again, it already has the necessary endpoints to get a new generated code to be used against the resource server. No need to ask for the credentials.
Hands-On
I will create three backends. The first one will be the Authorization Server. I will call it backend-auth, and I need the following dependencies.
    <dependencies>
		<dependency>
			<groupId>org.springframework.boot</groupId>
			<artifactId>spring-boot-starter-data-jpa</artifactId>
		</dependency>
		<dependency>
			<groupId>org.springframework.boot</groupId>
			<artifactId>spring-boot-starter-web</artifactId>
		</dependency>
		<dependency>
			<groupId>org.springframework.boot</groupId>
			<artifactId>spring-boot-starter-security</artifactId>
		</dependency>
		<dependency>
			<groupId>org.springframework.security</groupId>
			<artifactId>spring-security-oauth2-authorization-server</artifactId>
			<version>0.3.0</version>
		</dependency>
		<dependency>
			<groupId>org.projectlombok</groupId>
			<artifactId>lombok</artifactId>
			<version>${lombok.version}</version>
		</dependency>
		<dependency>
			<groupId>org.mapstruct</groupId>
			<artifactId>mapstruct</artifactId>
			<version>${mapstruct.version}</version>
		</dependency>
		<dependency>
			<groupId>org.mapstruct</groupId>
			<artifactId>mapstruct-processor</artifactId>
			<version>${mapstruct.version}</version>
		</dependency>

		<dependency>
			<groupId>org.postgresql</groupId>
			<artifactId>postgresql</artifactId>
			<scope>runtime</scope>
		</dependency>
	</dependencies>
The next backend is the Resource Server, with the name backend-resources.
    <dependencies>
		<dependency>
			<groupId>org.springframework.boot</groupId>
			<artifactId>spring-boot-starter-oauth2-resource-server</artifactId>
		</dependency>
		<dependency>
			<groupId>org.springframework.boot</groupId>
			<artifactId>spring-boot-starter-security</artifactId>
		</dependency>
		<dependency>
			<groupId>org.springframework.boot</groupId>
			<artifactId>spring-boot-starter-web</artifactId>
		</dependency>
	</dependencies>
I will skip some common configuration that you can see in my GitHub repository. In the backend-auth, I’ve configured the connection to the database, created the table and the entity to store the users, also created the repository and a DTO with a mapper to read the incoming credentials. Then the password encoder used to store the passwords and the algorithm to generate the tokens. In the backend-resources, I’ve just created the endpoint which returns the protected information. Let’s say some messages. And in the backend-client, I’ve done nothing.
Resource Server Implementation
Let’s start with the easiest one, backend-resources. Here, I need to protect all the endpoints with a given scope. The services which request those endpoints must be authenticated with OAuth2 and have a specific scope.
    @Bean
    public SecurityFilterChain securityFilterChain(HttpSecurity http) throws Exception {
        http.mvcMatcher("/**")
                .authorizeRequests()
                .mvcMatchers("/**")
                .access("hasAuthority('SCOPE_message.read')")
                .and()
                .oauth2ResourceServer()
                .jwt();
        return http.build();
    }
With lines 3 and 4, I protect all the endpoints with the authentication. With line 6, I indicate which scope is necessary to request the endpoints. Finally, at line 9, I indicate that I’m a resource server and a JWT will be used to validate the authentication against the Authorization Server. Let’s go now to configure the Authorization Server in this backend.
spring:
  application.name: backend-resources
  security:
    oauth2:
      resourceserver:
        jwt:
          issuer-uri: http://backend-auth:8081
This makes backend-resources the ability to validate the code which comes from backend-client.
Client Server Implementation
Let’s go now with the client, with the backend-client. Let’s start with the public controller.
    @GetMapping("/messages")
    public String getMessages(@RegisteredOAuth2AuthorizedClient("messages-client-authorization-code")
                              OAuth2AuthorizedClient authorizedClient) {
        return webClient.get()
                .uri("http://backend-resources:8082/messages")
                .attributes(ServerOAuth2AuthorizedClientExchangeFilterFunction.oauth2AuthorizedClient(authorizedClient))
                .retrieve()
                .bodyToMono(String.class)
                .block();
    }
In the controller, at lines 2 and 3, I need to indicate that the requested endpoint will require the OAuth2 client to be correctly authorized. This OAuth2 client contains the information about the scope and the Authorization Server. When done, at line 5 , the current backend-client will request the backend-resources for the messages. In the request, I must now include the OAuth2 attributes with the line 6. Finally, return to the end user the information from backend-resources at line 7. The request to backend-resources is done with the WebClient from WebFlux. Let’s see how to configure it.
    @Bean
    public OAuth2AuthorizedClientManager authorizedClientManager(
            ClientRegistrationRepository clientRegistrationRepository,
            OAuth2AuthorizedClientRepository authorizedClientRepository
    ) {
        OAuth2AuthorizedClientProvider authorizedClientProvider = OAuth2AuthorizedClientProviderBuilder.builder()
                .authorizationCode()
                .refreshToken()
                .build();
        DefaultOAuth2AuthorizedClientManager authorizedClientManager =
                new DefaultOAuth2AuthorizedClientManager(clientRegistrationRepository, authorizedClientRepository);

        authorizedClientManager.setAuthorizedClientProvider(authorizedClientProvider);
        return authorizedClientManager;
    }

    @Bean
    public WebClient webClient(OAuth2AuthorizedClientManager authorizedClientManager) {
        ServletOAuth2AuthorizedClientExchangeFilterFunction oauth2Client =
                new ServletOAuth2AuthorizedClientExchangeFilterFunction(authorizedClientManager);
        return WebClient.builder()
                .apply(oauth2Client.oauth2Configuration())
                .build();
    }
The OAuth2AuthorizedClientManager is the one dedicated to maintaining the authentication with the Authorization Server up to date. It’s the one which will request the initial authorization or for a refresh token when the first one expires. Then comes the WebClient. The WebClient must also be aware of the OAuth2AuthorizedClientManager. As the authorization code received from the backend-auth must be sent back to backend-resources to request the protected resources. Let’s now quickly see the security filter chain.
    @Bean
    public SecurityFilterChain securityFilterChain(HttpSecurity http) throws Exception {
        http
                .authorizeRequests(authorizeRequests -> authorizeRequests.anyRequest().authenticated())
                .oauth2Login(oauth2Login -> oauth2Login.loginPage(
                        OAuth2AuthorizationRequestRedirectFilter.DEFAULT_AUTHORIZATION_REQUEST_BASE_URI + "/messages-client-oidc"
                ))
                .oauth2Client(Customizer.withDefaults());
        return http.build();
    }
Here, at line 4, I indicate that all the common requests must be authenticated. And at line 5, to authenticate the request, the end user will be redirected to the OAuth2 login page which is present in backend-auth. Finally, at line 8, I indicate that this is an OAuth2 client server. Let’s finally see how the client is configured.
spring:
  application.name: backend-client
  security:
    oauth2:
      client:
        registration:
          messages-client-oidc:
            provider: spring
            client-id: messages-client
            client-secret: secret
            authorization-grant-type: authorization_code
            redirect-uri: "http://backend-client:8083/login/oauth2/code/{registrationId}"
            scope: openid
            client-name: messages-client-oidc
          messages-client-authorization-code:
            provider: spring
            client-id: messages-client
            client-secret: secret
            authorization-grant-type: authorization_code
            redirect-uri: "http://backend-client:8083/authorized"
            scope: message.read
            client-name: messages-client-authorization-code
        provider:
          spring:
            issuer-uri: http://backend-auth:8081
I need to configure both the OpenID connect and the OAuth2 authorization code workflow. Within the OpenID connect (from lines 7 to 14), I indicate the scope “openid“, and within the OAuth2 authorization code (from lines 15 to 22), I indicate the scope “message.read” which is the one asked in backend-resources. Finally, at line 25, I indicate where to locate the Authorization Server.
Authorization Server Implementation
The last step is to configure the Authorization Server, backend-auth, which will manage the credentials of the end user. Let’s directly start with the security filter chain.
    @Bean
    @Order(1)
    public SecurityFilterChain authorizationServerSecurityFilterChain(HttpSecurity http) throws Exception {
        OAuth2AuthorizationServerConfiguration.applyDefaultSecurity(http);
        http
                .exceptionHandling(exceptions -> exceptions
                        .authenticationEntryPoint(
                                new LoginUrlAuthenticationEntryPoint("/login"))
                )
        ;

        return http.build();
    }

    @Bean
    @Order(2)
    public SecurityFilterChain defaultSecurityFilterChain(HttpSecurity http) throws Exception {
        http.authorizeHttpRequests(authorize -> authorize.anyRequest().authenticated())
                .formLogin(Customizer.withDefaults());
        return http.build();
    }
The first noticeable thing is that I need to separate the SecurityFilterChain from my Authorization Server from the defaultSecurityFilterChain. Maybe in future versions of the Authorization Server, in more stable versions, this won’t be needed.
In the authorizationServerSecurityFilterChain, I only indicate that whenever I have an exception I redirect to the login page. And in the defaultSecurityFilterChain, I just protect all the endpoints and use the default login form used by Spring. Let’s go now with the registered clients.
    @Bean
    public RegisteredClientRepository registeredClientRepository() {
        RegisteredClient registeredClient = RegisteredClient.withId(UUID.randomUUID().toString())
                .clientId("messages-client")
                .clientSecret("$2a$12$/xdT4GByOtITcHq7SGtV.ORBMc.Vh3gu3nWz1IDuKxCiBBmG9aiLG")
                .clientAuthenticationMethod(ClientAuthenticationMethod.CLIENT_SECRET_BASIC)
                .authorizationGrantType(AuthorizationGrantType.AUTHORIZATION_CODE)
                .authorizationGrantType(AuthorizationGrantType.REFRESH_TOKEN)
                .redirectUri("http://backend-client:8083/login/oauth2/code/messages-client-oidc")
                .redirectUri("http://backend-client:8083/authorized")
                .scope(OidcScopes.OPENID)
                .scope("message.read")
                .scope("message.write")
                .build();

        return new InMemoryRegisteredClientRepository(registeredClient);
    }
Here is the same information as in backend-client. At lines 4 and 5 is the client-id and client-secret. This time, the client secret is encoded using the previously configured password encoder. Then, at line 6, comes the authentication which will be used to communicate between backend-client and backend-auth. At lines 7 and 8 are the workflows which will be used between the client and the Authorization Server. At lines 9 and 10, the authorized redirect URI. The acceptable scopes from lines 11 to 13. All of this will be stored in memory with the line 16. If i need a more dynamic authorization server, I can store this in a table in the database. And I even can create some endpoints to add, edit and delete the registered clients. And the last step is the configuration of the endpoints for the provider.
    @Bean
    public ProviderSettings providerSettings() {
        return ProviderSettings.builder()
                .issuer("http://backend-auth:8081")
                .build();
    }
I will leave the default settings for the endpoints. I just indicated the URL of the Authorization Server.
Workflow
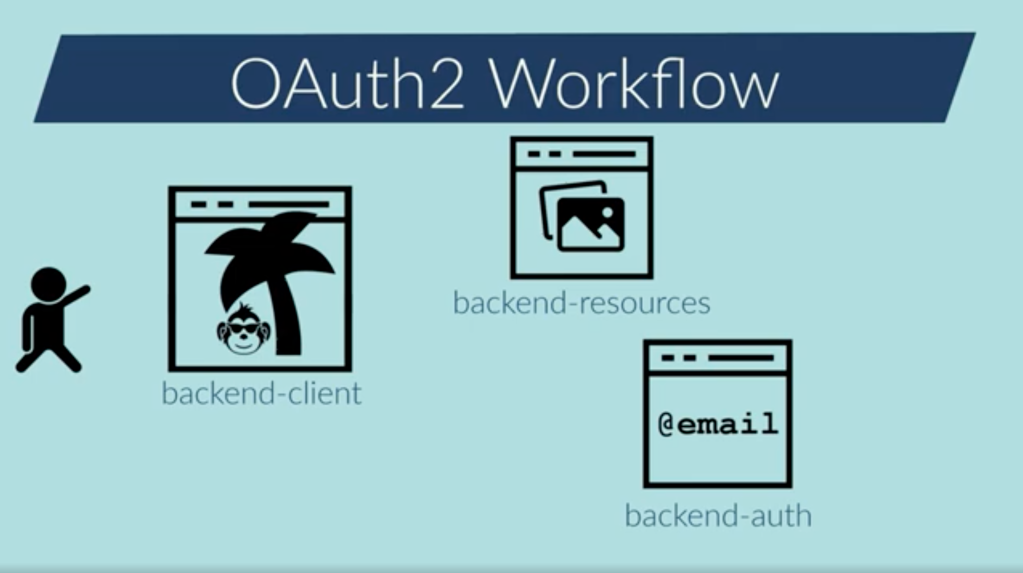
Good, I’ve created the three backends: backend-client is the one which is used by the end user, backend-resources which contains the protected messages backend-client will try to request, and backend-auth which is the only one where the credentials are stored.
When trying to get the messages from the backend-client endpoint, the endpoint requires information from backend-resources, so, the authentication is necessary and it’s delegated to the backend-auth. In the login form, I can see that the scope asked is the “openid“.
Once authenticated, the backend-client asks for the consent of the “message.read” scope. Once authenticated with the “openid” scope, backend-client asks for the scopes without asking again the credentials. Finally, I’m redirected to the original endpoint from backend-client. The request made to backend-resources isn’t visible to me, as the request is made from backend to backend.
Conclusion
- I’ve created three backends: backend-client which is the client, the one used by the end-user; backend-resources which is the one which has the protected resources; and backend-auth which is the only one which contains the credentials information.
- When asking for the protected resources on backend-client, it delegates the authentication to backend-auth.
- backend-auth proceeds with the authentication and asks the end user to give consent to backend-client to access the protected resources.
- Once accepted, backend-client is able to request backend-resources using OpenID Connect. backend-client doesn’t need to ask the credentials every time it requires to access other protected resources. It doesn’t ask for credentials neither if the tokens expire.

Leave a comment